Monday, November 17, 2008

American Butter Corn

Its been a long time I am updating my blog. We/I took a break and life was pretty busy, moving to a new apartment and settling down took us two tiresome weeks. Excited about our new apartment, it has a balcony.... and can't wait for Summer!!

Any one who recently visited India will know about this famous theater snack which is so popular amongst all the ages. Yes, I am talking about American Butter Corn. is famous in most of the movie theaters all across India especially in Andhra Pradesh. Some how I managed to bring that taste here, I make this for prasadam/offering to Saibaba. This recipe has less fat from one tbsp butter, It is a good source of fiber as we make from fresh corn and here goes the simple recipe.


American Butter Corn
Recipe Source: My Own
Cuisine: Global
Preparation time: 10 minutes
Cooking time: 10 minutes
Makes: 4-5 people

Ingredients:
3-4 fresh sweet corn
2 tbsp fresh parsley, chopped
freshly ground black pepper
1 tsp red chilli powder
1 tbsp butter
salt as per your taste
4 cups of water

Method:
  • Bring 4 cups of water to boil, to this add salt. Break fresh corn into two or three pieces and boil the cobs for 10 mins.
  • Peel corn from the cob.
  • Take a saute pan, heat it on medium high, add butter to that. Now add corn, freshly ground black pepper, pinch of salt and chilli powder.
  • Mix well so that excess water is evaporated, at the end mix in some chopped parsley or cilantro. You can play with the flavours here by adding different kinds of herbs and spices.

Monday, October 27, 2008

Wish you a Happy Diwali


Hope this Diwali fills your year with joy and continues to brighten the rest of your life


I wish all my friends, my readers a very
Happy Diwali.


Festival Food ~ Chivda

festival food ~ Chivda
Its been a long time I was away from blogging. There were few things to attend first and blogging took a back seat. Diwali is here so I took this opportunity to write a post related to Festival Food. Festivals are always celebrated with much zeal, pomp and show in Bombay. During Diwali when you step into that multi-storied apartments you can smell, shankarpala, karanji, chakali, ladoo etc etc from everyone's kitchen.

'Faraal' ~ Festival food as is called in Marathi is made with so much of love and passion and distributed to our friends and relatives on the day after Diwali. All the three of us used to help my mother in the preps of these fabulous Faraal and some times used to eat the raw dough made for
Shankarpala.

Chivda is a traditional Maharashtrian snack made for Diwali and is called by many different names across India. Chivda is a combination of toasted rice flakes, roasted peanuts, cashews, dalia and any of your favourite ingredients. In general it is a mixture of so many different flavours and definitely reflects the diversity of cultures in India, now here is the recipe. Chivda tastes good if you make it with thin poha.

Chivda
Recipe Source: My Mother
Cuisine: Maharashtrian Cuisine ~ Indian
Preparation time: 10 minutes
Cooking time: 30 minutes
Makes: 20-25 people

Ingredients:
10 Cups thin rice flakes, thin poha/atukullu
¾ cup peanuts/chanakayalu
¾ cup dalia/ chutney dal/putnalu
¾ cup cashewnuts/kaju/jeedipappu
½ cup raisins/khishmish
¼ cup curry leaves/kadipatta/karvepaku
¼ dried coconut flakes/ sukha khobra/endu kobbari
3 tbsp toasted fennel seeds/badi sop
1 tsp red chilli powder/karam
2 tsp turmeric/haldi/pasupu
4-5 tsps sugar
2 tsps salt as per your taste
5 tbsp cooking oil

Method:
  • Sift thin poha in batches to remove any powdered flakes, otherwise it may result in powdered Chivda. It is always good to sift them through bigger filter to get rid of small powered poha flakes.
  • I fry them batch wise in a large kadai. Heat 2 tbsp of cooking oil, add 1 tsp of turmeric and immediately add 5 cups of rice flakes/poha. Start stirring so that all the poha flakes are evenly covered with oil and turmeric. Fry them on medium flame and make sure not to burn poha by constantly stirring and folding the poha flakes.
  • Remove once they are done and repeat the same steps for the second batch. Place them in a big mixing bowl or on a large sheet of paper.
  • Now fry individually in a teaspoon of oil roast cashew nuts, peanuts, dalia and curry leaves. Pour them over the fried poha flakes.
  • Dry toast coconut flakes and fennel seeds and add it to fried poha flakes.
  • Lastly add raisins/ kishmish, red chilli powder, salt and sugar and mix them properly with the other ingredients and fried poha flakes, check for salt and sugar. Take special care not to break the poha, when you mix it. You have to handle them delicately.
  • Box it in an air-tight container and Chivda is ready to serve/ share.

I cannot end this post without mentioning about the recent loss of our dearest family member, my brother-in-law on 7th Oct 2008. This dedication goes to him as he loves Chivda so much.

"There will always be the presence of his absence and it can never be filled"
May his soul rest in peace, Amen!

Monday, October 6, 2008

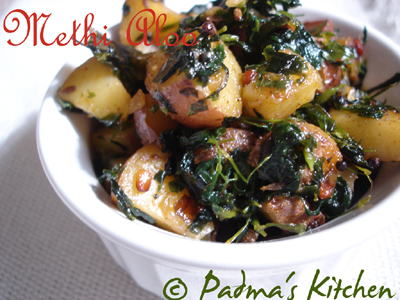
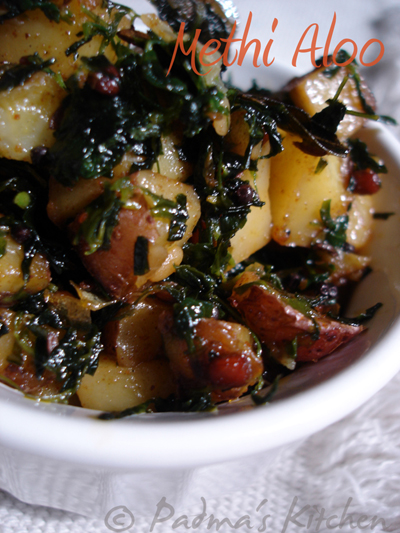
Methi Aloo

Did I tell you that Potatoes are my favourite roots of all. I love to have them with almost anything. As it is known to all that potatoes are rich in starch and carbohydrates and many are watching their carb consumption. I must say they are even keeping me away from blogging, no I was just kidding! But I agree that they make me dozzZzy Zzzz Zzzz ZZz!!!

Frying potatoes with methi leaves for me is a Maharashtrian cuisine. I do know that Methi Aloo might be some north-indian cuisine too. I always like this with hot steamed rice and dal or chapatis. Methi leaves used here in this recipe are picked straight from my window garden. I will update my garden photos shortly.

My window garden, Fenugreek/Methi


Medicinal information on Fenugreek leaves
Use a lot of fenugreek (methi) in your culinary preparations. Why? For the simple reason that it is so healthy. This wonder herb, a very popular vegetable in the Indian cuisine is a nature’s boon to mankind. Besides, it is so appetizing, light and dry. Rich in protein, calcium, phosphorus and iron in their natural forms, its mineral and vitamin contents are also very high and this is easily assimilated by our body. This is extracted from beauty and personal grooming. For more on information on Methi leaves, its medicinal benefits and home remedies do check the informational blog here beauty....


Methi Aloo

Recipe Source: Friend

Cuisine: Maharashtrian Cuisine ~ Indian
Preparation time: 20 minutes
Cooking time: 30 minutes

Ingredients:
6-7 red skin potatoes, diced and cubed into small pieces
1 small bunch of
fenugreek leaves/methi leaves/menthaaku
1 tsp red chilli powder/cayenne powder/karam
a pinch of turmeric/haldi/pasupu
for tempering/seasoning:
2 tbsp cooking oil
1 tsp cumin/jeera/jeelakara
1 tsp mustard/rai/avaalu
1 tsp black gram/urad/minapappu
5-6 curry leaves

Method:

  • Clean and roughly chop the methi leaves/fenugreek leaves.
  • Heat oil in a frying pan or kadai. Add all the seasoning ingredients. Fry for a minute and then add the diced and cubed red potatoes with its skin on.
  • Fry for 15-17 minutes or till the potatoes are cooked. Sprinkle some salt, turmeric and cayenne pepper/karam and stir so that all the spices are mixed well.
  • Lastly add fenugreek leaves/methi leaves, let it cook for 3-4 mins and stir so that leaves are mixed well.
  • Serve it with hot steamed rice or rotis/Indian flatbread.
I am sending this to Susan of The Well Seasoned Cook, Weekend Herb Blogging is brainchild of Kalyn from Kalyn's Kitchen. Do not forget to check the new rules on weekend herb blogging

More tasty Aloo(potato) recipes from my blog:
Jeera Aloo
Punjabi Gobi Aloo muttar

Tuesday, September 23, 2008

My favourite Apple Cake!!!

There is nothing more soothing than the aroma of
freshly baked apple cake with cinnamon!!

Fall has arrived and so does the season of Apples arrive. I first tasted this Apple cake at one of my friends baby shower. As a foodie you know, without much hesitation I asked my friend the recipe for the fabulous cake. Since then I have been baking this cake for more than 3 years now. This recipe is for a keepsake, tried and tested for sure! Coz it won't betray you nor abandon you.

I baked and gifted this cake to most of my friends and they can verdict about its taste and texture. I often bake them with Gala Apples when I don;t get hold of Green Granny Smith Apples. I sometimes bake it in a tube pan, sometimes in a bundt pan, sometimes in round and sometimes in a rectangle pan. It is totally up to you! So I can say this is such a versatile recipe and can accommodate in any kitchen.

here is my slice of cake!


Apple Cake

Recipe Source: Friend

Cuisine: International Cuisine ~ American
Preparation time: 25 minutes
Cooking time: 50 - 80 minutes

Ingredients:
For Cake:
Butter, for greasing pan
3 cups all-purpose flour
2 cups sugar (you can reduce to 1½ cup)
1 tsp baking soda
¼ tsp salt
1 tbsp cinnamon powder (I use 1 tsp)
3 eggs
1½ cups vegetable oil
¼ cup orange juice
1 tbsp vanilla extract
3 cups Apples, cored, peeled and finely chopped (pref. Granny Smith apples)
1 cup shredded coconut
1 cup chopped almonds (any nuts)
For Sauce:
½ cup (1 stick) butter
1 cup sugar (you can reduce to ¾ cup)
½ cup buttermilk
½ teaspoon baking soda

Method:
  • Preheat the oven to 325°F[165°C]. Generously grease a tube pan.
  • For cake: In a large bowl, combine sugar, eggs, oil, orange juice, flour, baking soda, salt, cinnamon and vanilla extract; and mix well.
  • Fold apples, coconut, and pecans into batter.
  • I used a Bundt cake pan and a normal round cake pan for baking this cake.
  • Pour the batter into the prepared pan and bake until a tester comes out clean, about 1½ hours.
  • Shortly before the cake is done, make the sauce.
  • For Sauce: Make sauce in a deep pan else it will overflow when it starts boiling.
  • Melt the butter in a large saucepan, stir in sugar, buttermilk, and baking soda, and bring to a good rolling boil, stirring constantly.
  • Boil for 1 minute. Pour the sauce over hot cake as soon as you remove it from oven.
  • Let stand 1 hour, then turn out onto a rack to cool completely.Cut into pieces and serve. It tastes better when served cold.
  • I bake my cake a little longer to get a nice, yummy crust. I love it that way!

Sending this photo to Click-Sep 2008
Related Posts with Thumbnails