Tuesday, October 30, 2007

Paneer Pyaaz Paratha

Onion Cheese Parathas ~ Stuffed Indian flat bread

Ask anyone? Parathas are all time favorite for Indians and that too if you have it at Dhaba or at your Punjabi friend's place. My recent indulgence with parathas is quiet a story. I love trying different types of stuffed parathas, and amongst them aloo, gobi and mooli are my top favorites. Parathas are such filling food and needs no accompaniment. We can have them with plain yogurt, Indian pickle and salad, thats it!

Parathas are made usually on Friday evenings here at my home, our concept is to treat our senses during weekends. Evening snacks are a strict no no during weekdays and dinners are usually around 6:30 pm, we are early birds, so far :)

"Early to bed, Early to rise"

So when it comes to friday, its like we have a heavy snack to pounce on followed by some Friday night movies. This recipe is from Tarla Dalal's site and you can find many paratha stuffing variations in her website. I am glad I fumbled upon this recipe.


Source : Tarla Dalal
Cuisine: North Indian, Punjabi
Prep time: 15 mins
Cooking time: 15 mins
Serves: 4-6 people
Ingredients:
2 C whole wheat flour
1 1/2 C Paneer/ Indian cottage cheese, grated
2 big onions, finely chopped
1 small bunch of cilantro/hara dhaniya , coarsely chopped
1 inch fresh ginger
2 garlic cloves
2-3 Indian green chillies, finely chopped
1/2 T red chilli powder
2 T garam masala powder/Indian spice mix
Salt as per taste
2 T cooking oil
Method:
  1. Make dough by mixing the wheat flour, salt, water and oil. Cover it and keep aside for 30 mins.
  2. Make a paste of ginger, garlic and green chillies together. Heat oil in a pan, sauté onions till translucent and changes the color, add little bit of salt to sweat the onions. Add the paste and fry for a minute. Add shredded paneer, mix well and take off the heat. To this add garam masala powder, red chilli powder and salt, mix well. Let it cool.
  3. Make equal size balls of dough, roll into 2" disk and fill 2 T of Paneer-Pyaaz filling and roll into 3-4" disk just like you do for any ordinary parathas.
  4. While roasting add some oil/ghee/butter on both the sides of the paratha.
  5. Serve hot with fresh yogurt mixed with cilantro and ajwain seeds, Indian pickle, with a dash of butter.
Tips: Red and green chilli can be used as per your choice as while making for kids this can be reduced or completely opted out. While making the parathas take care not to press too much with the rolling

You can find in detail on how to make parathas from here and here.


Thursday, October 25, 2007

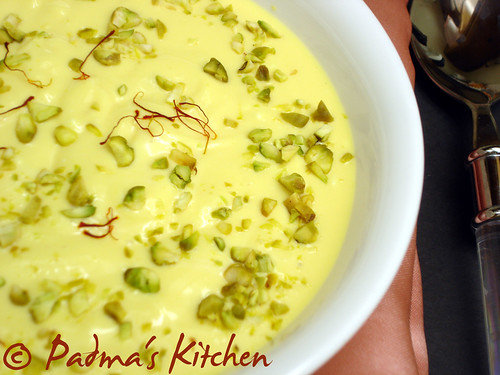
Kesar Pista Amrakhand ~ Indian Dessert

Kesar Pista Amrakhand

Shrikhand is an Indian dessert mostly popular in Northern and Western India. Amrakhand is mango flavored dairy dessert from the west of India. It can be made well in advance and stored in the refrigerator until needed. Use a really thick yogurt for the best results.

Without much introduction I am posting this in a hurry to participate in the Think Spice! Saffron event, hosted by Sunita, hope I have not crossed the deadline.


Source : My Own
Cuisine: Indian
Prep time: 6-7 hrs/overnight
Cooking time: 10 mins
Serves: 4-5 people
Ingredients:
2 C of Homemade yogurt
1/2 C Mango pulp or thinly sliced ripe mango cubes
1/2 C Sugar
2 T Milk, warm
6-7 strands of Saffron
1/2 C Pistachios, coarsely chopped
1/2 t Cardamom powder
Method:
  1. Place the yogurt in a clean muslin cloth, tie securely and allow to hang for 6-7 hrs or leave overnight to drain off the liquid. Place a bowl under the bag to catch the drips or place over the sink.
  2. Meanwhile peel the mangoes. Remove the flesh from the pit or stone, slice the flesh and cut into thin strips. Or else you can completely ignore this and take 1/2 cup of Mango pulp which we get in Indian groceries.
  3. First remove the yogurt and mash thoroughly and to this add the sugar and mix well to combine with the thick yogurt. Soak some saffron in warm milk.
  4. Add the soaked saffron milk, mango pulp and cardamom powder and stir well so that all the ingredients are well amalgamated.
  5. Garnish with chopped pistachios and few strands of saffron. Cover and chill in the refrigerate until needed. Serve sprinkled with chopped pistachios and saffron strands.
Tips: Instead of Mango you can try this with Strawberry / Rasberry and Pineapple mix. This will give different flavor


Monday, October 22, 2007

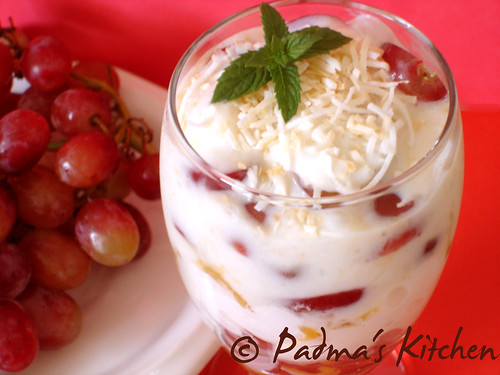
Ambrosia Parfaits ~ Homestyle Dessert


With the temperatures still around 70's in the North east, I felt there is still time for Homestyle desserts. Though I love to eat this cool treats any time of the year this easy to make dessert can be handy and fancy to treat our unexpected guests in a whip.

Layers of sliced oranges, grated coconut and confectioners sugar are combined to make this dessert that Southerners call "ambrosia". One might see this recipe as gliding the lily, but layering oranges, pineapple, grapes and coconut with frozen yogurt does create a truly irresistible treat.

Source : adapted from Healthy Home Cooking
Cuisine: American, International
Prep time: 7 mins
Serves: 4-5 people
Ingredients:
2 T sweetened shredded coconut
2 medium navel oranges
1/2 C halved seedless red grapes
1/2 C drained crushed juice-pack pineapple and 1 T juice reserved
1 pint non fat vanilla frozen yogurt, slightly softened
I used ginger infused 1 C home-made yogurt with 1/2 C granulated sugar
Mint sprigs for garnish (optional)
Method:
  1. Toast the coconut flakes/shreds over medium heat, tossing frequently, for 2 to 3 mins or until lightly browned. Transfer the coconut to a small plate to cool.
  2. Using a sharp paring knife, remove the peel and white pith from the oranges. Cut the oranges crosswise into 1/2 inch thick slices, then chop coarsely. Transfer the chopped oranges to a bowl, add the grapes and the pineapple with its reserved juice and mix.
  3. You can use the store bought vanilla flavored yogurt or you can make one of your own by adding 1/2 C of sugar to 1 C of home made yogurt. Here I used 1 tsp ginger powder to infuse the flavor and leave in the freezer for 3 hrs. Just before serving thaw for 5-7 mins before you serve the dessert to soften the yogurt.
  4. Divide one-third of the fruit mixture among 4 parfait glasses or dessert dishes. Using half of the yogurt, spoon a layer of yogurt over the fruit. Alternate layers of the remaining fruit mixture and yogurt in the glasses. Sprinkle the parfaits with the toasted coconut and garnish with mint sprigs if desired.
  5. Serve immediately and Enjoy!

Thursday, October 18, 2007

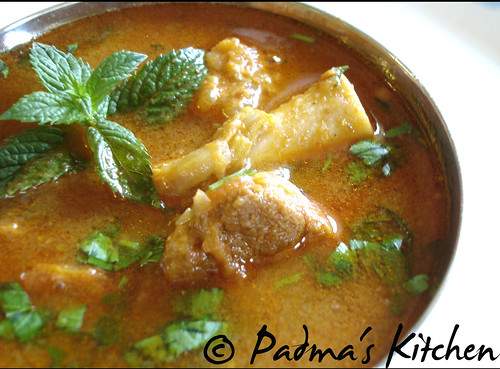
Traditional Mutton Kura ~ Lamb Curry

Traditional Mutton Kura~Lamb Curry

Winter is in the air and when the air feels crispy we all have those wild, spicy and hot cravings to munch on hot stews, soups and of course something meaty-spicy if you are a carnivore. This traditional mutton recipe, I learned it from my mother. We have meat on Sundays and Wednesday, other days are strictly vegetarian meal only. So every Sunday is like waking up with beautiful aroma from my mom's kitchen where she would be cooking mutton or chicken or some fish. She makes this special wet garam masala paste and uses it in her every non veg dish. I grew up tasting and eating this dish and thought of sharing this with you all. The secret ingredient here is grated potato to get the thick gravy base for this mutton stew/curry.

I kept postponing to post this mutton recipe for a long time now. As I noticed that I have blogged very few non-vegetarian recipes so far, presenting yet another "My Mother's creation of Magic" hope you all will enjoy!

Traditional Style Mutton Curry ~ Lamb stew


Source : My Mother
Cuisine: Andhra, South Indian
Prep time: 20 mins
Cooking time: 20 mins
Serves: 4-5 people
Ingredients:
1 pound lamb/goat meat, cut into cubes or desired size
1 large red onion, thinly sliced
1 large tomato, cubed
2 green chillies, cut lengthwise
1/2 tsp turmeric powder/haldi
2 tsp red chillies powder/cayenne pepper
1 tsp garam masala powder
1 large potato, grated
2 tbsp fresh mint, chopped
2 tbsps of lemon juice
3/4 cup water
2 tbsp cooking oil
salt as per taste
cilantro for garnish

roast (dry ingredients) and grind into smooth paste:
1" stick of cinnamon
2 cloves
½ tsp poppy seeds/khus khus
2 tsp grated coconut (fresh or dried)
2-3 big cloves of garlic/ 5-6 small indian garlic cloves
1 inch piece of ginger (optional)
2 dried red chillies
1 tsp of cumin seeds/jeera
1 tsp of coriander seeds/dhaniya
1/2 tsp black pepper
1/2 onion, coarsely chopped
1/2 tomato, coarsely chopped
2-3 green chillies
1/2 tsp grated nutmeg
salt
Method:
  1. First clean the meat and cut as per your specifications, I cubed the pieces and left the meat on bone. Clean it twice under running tap water and marinate with red chilli powder, salt and lemon juice, wrap it and keep aside for 1 hr or overnight in the refrigerator.
  2. Grind the wet masala paste. Meanwhile saute some onions and green chillies in 2 tbsp of cooking oil in a pressure cooker. Saute till the onions turn pink, then add the tomatoes and the prepared masala paste. Cook on high till the raw aroma is gone for about a min.
  3. Add the mutton pieces, turmeric, mint, grated potato and salt. Mix well so that the mutton pieces are evenly coated with the gravy, add little water, cover the lid and put on the whistle. Pressure cook for 4-5 whistles.
  4. Once the pressure is off, open the cooker and check if the meat is cooked through. If you feel the curry is too watery, then cook on high for about 10 mins till the excess water evaporates. Garnish with cilantro and serve hot with biryani, pulav, plain rice or rotis/chapatis or Indian flat bread.
Note: adjust your spice level accordingly while using green chillies or chilli powder.

I know I am very lazy and keep forgetting to mention a kind gesture showered upon me by Shanthi of MyKitchenHobbies. Shanti presented me "The POWER OF SCHMOOZE AWARD" last month and I kept forgetting to include in my posts, Nevertheless late!!! Shanti, sorry for late addressing this but I am really very thankful that you thought of me for this award. Thanks ra!


" The POWER OF SCHMOOZE AWARD is the award for bloggers who effortlessly weave their way in and out of the blogosphere, leaving friendly trails and smiles, happily making new friends along the way. They don't limit their visits only to the rich and successful, but spend some time to say hello to new blogs as well. They are the ones who engage others in meaningful conversations, refusing to let it end at a mere hello - all the while fostering a sense of closeness and friendship. " and as per the tradition I would like to pass this award to:

Latha N & Lakshmi of "The Yum Blog"
Meeso of "My Humble Kitchen"
Vi of "East meets West Kitchen"
Cynthia of "Tastes like Home"
Richa of "As Dear as Salt"
Lisa of "Lisa's Vegetarian Kitchen"

Update 10/18/07 at 12:37 pm
For all vegetarians, you can substitute meat with soya chunks, carrots, paneer, cauliflower, and potatoes. It will turn into an interesting veggie stew. Feed your imagination and take this spicy ride!

Tuesday, October 16, 2007

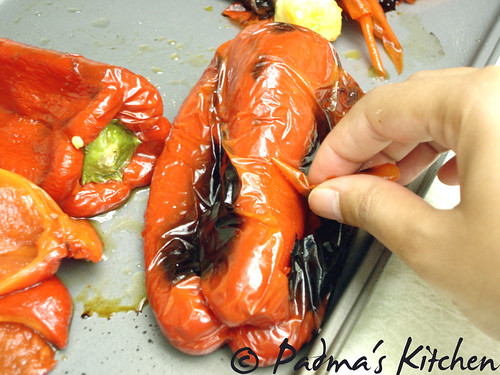
Homemade Roasted Red Peppers


Roasted-Red-Peppers2

Enjoy the succulent sweetness of a freshly roasted pepper prepared at home. Roasted peppers are a wonderful thing and easy to make. I brought few red peppers this time when I visited my local farmer's market. After drooling over Lisa's Corn and Roast pepper soup , I fumbled upon this link from her post on how to roast peppers at home.

Method:
  1. Preheat the oven to broiler. I took 3 red peppers, wash the peppers but leave them whole its recommended to use 2 tsps of canola oil for each pepper. They may be rubbed with any cooking oil but not olive oil as it has low smoke point.
  2. Coat each pepper evenly with oil using your pastry brush or hands and arrange the peppers on a baking sheet and place the sheet on the highest rack of your oven, close to the broiler.
  3. Keep a watchful eye on the peppers to ensure that they do not become too scorched. When dark splotches begin to appear on the peppers, remove the baking sheet from the oven and carefully turn each pepper over.
  4. The peppers will be hot, so use tongs or any other kitchen gadget to turn them and return under the broiler for roasting.
  5. When the tops of the pepper appear to begin darken remove from the oven and place them in a large bowl and immediately cover it with a lid or plastic wrap. Let is sit for a while till the peppers are cooked in its own steam for about 15-20 mins or so.
  6. Once cool they are easy to handle, gently peel the skin which will be loose by now and remove its stem, core and seeds.
  7. Lay flat on the surface and cut into desired stripes and store it in container along with the liquid/juice and also add few tsps of olive oil (optional) . Refrigerate them as shown in the picture and roasted peppers are ready for use in sandwiches, salads, antipasto platter and rest is up to your imagination.
  8. For pictorial version check here and for more tips on roasting peppers check here and here
Roasted-Red-Peppers3
Stored in refrigerator

Related Posts with Thumbnails