Saturday, December 25, 2010

Homemade Roasted Red Peppers


Roasted-Red-Peppers2

Enjoy the succulent sweetness of a freshly roasted pepper prepared at home. Roasted peppers are a wonderful thing and easy to make. I brought few red peppers this time when I visited my local farmer's market. After drooling over Lisa's Corn and Roast pepper soup , I fumbled upon this link from her post on how to roast peppers at home.

Method:
  1. Preheat the oven to broiler. I took 3 red peppers, wash the peppers but leave them whole its recommended to use 2 tsps of canola oil for each pepper. They may be rubbed with any cooking oil but not olive oil as it has low smoke point.
  2. Coat each pepper evenly with oil using your pastry brush or hands and arrange the peppers on a baking sheet and place the sheet on the highest rack of your oven, close to the broiler.
  3. Keep a watchful eye on the peppers to ensure that they do not become too scorched. When dark splotches begin to appear on the peppers, remove the baking sheet from the oven and carefully turn each pepper over.
  4. The peppers will be hot, so use tongs or any other kitchen gadget to turn them and return under the broiler for roasting.
  5. When the tops of the pepper appear to begin darken remove from the oven and place them in a large bowl and immediately cover it with a lid or plastic wrap. Let is sit for a while till the peppers are cooked in its own steam for about 15-20 mins or so.
  6. Once cool they are easy to handle, gently peel the skin which will be loose by now and remove its stem, core and seeds.
  7. Lay flat on the surface and cut into desired stripes and store it in container along with the liquid/juice and also add few tsps of olive oil (optional) . Refrigerate them as shown in the picture and roasted peppers are ready for use in sandwiches, salads, antipasto platter and rest is up to your imagination.
  8. For pictorial version check here and for more tips on roasting peppers check here and here
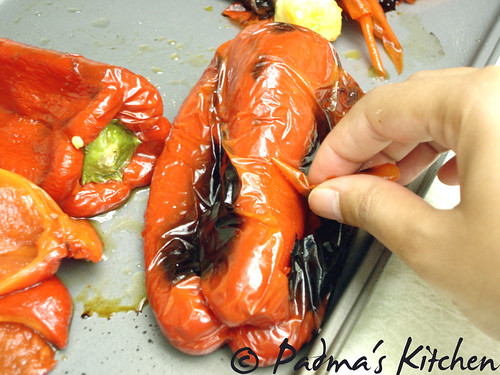
Roasted-Red-Peppers3
Stored in refrigerator

Friday, September 10, 2010

Malai Peda

Ganesh Chaturthi Sweet ~ Malai Peda

I wish all my readers, visitors and friends a very Happy Ganesh Chaturthi. And thought this is the right time to post a Peda recipe for "Lord Ganapati Bappa". This is simple yet another easy to make recipe from Ricotta cheese.

Prep time: 10 mins
Cooking time: 45 mins
Makes: 10-15 people
Ingredients:
15oz Whole Milk Ricotta Cheese
1 cup Heavy Cream
1/2 tsp Cardamom Powder
3-4 Strands Saffron
1/2 cup Sugar
Method:
  • Heat the ricotta cheese in a wide mouthed pan on medium heat for 6-7 mins. Stir constantly. The cheese would first loosen up and then the liquid starts evaporating.

  • At this point you have to add the cream, saffron (crushed between your fingers/palm) and cardamom/elaichi powder and keep stirring all together till all the liquid dries up.

  • Once the cheese gets its texture, its time to add the sugar. Now cook it on high flame till the mixture forms a ball. Keep in mind to stir through out this procedure, you will need strong arms to do this. JB (my DH) helps me out in the kitchen for this.

  • Turn the heat off and let it cool a little bit. Don't wait for too long or else you will end up with hard lump of ball to work with.

  • Shape them into modak or peda, which ever works best for you. If you have a modal shape mould that will save you some time or to shape into modaks, take 1 tbsp of mixture and make a smooth ball. Now, using the all your fingers pull a little bit of a mixture ,elongating it. Press the other side of the ball on the counter or the plate. To shape into pedas, take a tsp of the mixture, shape into a ball and flatten it a little between your palms.

  • Its really simple and very much resemble like store bought.

Have fun and enjoy this festival with loads of sweets and blessings from God Ganesha.

Monday, July 19, 2010

Ricotta Cappucino


An Easy to make Dessert ~ Ricotta Cappucino


As the name says it is an easy Italian Dessert, adapted from Giada's version. I love cooking Italian food and when it comes to desserts, I love Giada's recipes most. I made this for the first time last year and It was an instant hit!!! It was super easy and delicious. And since then we have been making it quiet often. I forgot to post it on my blog, so this time when I made it, I took some pictures to post on my blog. I promise that you will definitely like it and will make it again and again and again!!

Source: Adapted from Giada's version

Cuisine: American
Prep time: 15 mins
Serves: 4
Ingredients:
1/2 C sugar
1/2 t vanilla essence/extract
1 (15-oz) container ricotta cheese
1/2 T instant espresso powder(I used Indian brand, instant coffee powder Bru)
for topping/garnishing:
Handful of Pistachios, crushed
Pinch cocoa powder

Method:
  • Take sugar, ricotta cheese in a food processor, pulse it so that the sugar and cheese are fairly blended together.
  • To this mixture add vanilla extract and espresso powder (Indian brand instant coffee powder like Bru or Nescafe) and blend it for one min.
  • Stop the machine and scrape down the sides of the with a rubber spatula. Blend for another minute.
  • Spoon the mixture into 4 small coffee mugs.
  • Cover and refrigerate for at least 1 hour and up to 1 day.
  • To serve, top the ricotta cappuccino with crushed pistachios. Sprinkle with cocoa powder.


DH is kinda addicted to this recipe and loves to make it when I am not in a mood to prepare any dessert. This easy to make dessert is my DH's favorite one. He always makes this when we have potluck or when there is GUYS only cooking event. Children also love eating it and its healthy too, if you minus the cappuccino from the recipe.


Sunday, July 4, 2010

Padma's Kitchen turned 3, today!!


Padma's Kitchen is celebrating its 3rd year. Time flies so fast and three years gone by and what I started as a time pass just to come out of my boredom or you can say kill time has shaped up into a beautiful journal of my favorite recipes. This blog helped me making new friends and get along with so many foodie lovers like me. It totally a different world of people out there sharing same passion as mine "FOOD". And I am so happy that BLOGGING happened to me.... It was such a wonderful and fascinating journey.....

Though most of the time for the past one and half years I was dormant (b'coz of the arrival of my LO), My pledge this year is I will try to be regular from now onwards. Lots of things are happening at my kitchen, I am working on a new template, which has more features and options for new as well as old visitors, the design will be more vibrant and appealing. One more step I took regarding our health is to eat healthy ans stay healthy and fit. So you will be seeing more healthy recipes, tips and ideas of eating healthy, staying healthy and more about healthy diets too. I am excited that so much is at the horizon, but might take couple of months to see this new look here.

Past three years was a memorableexpedition filled with love, rich of life, exploring and learning new things everyday, 'Thank you' all for being a wonderful part of this journey.......

Happy 3rd Birthday my dear blog!!

Luv

Wednesday, June 16, 2010

Hearty Lettuce, Carrot, Cherry tomatoes Salad with homemade dressing


A crowd pleasing salad with homemade vinaigrette


I am back from my vacation to India and back to blogging with a hearty salad recipe from my kitchen. Actually blogging took a back seat after arrival of Anshika,my darling daughter. This post has a reason to be here on my blog, if interested read on.......

June's 1st weekend we drove to Albany, NY to attend a birthday party of our closest friend's daughter. For the party I made this salad which everyone appreciated and enjoyed eating as much as I loved making it all the while hoping it to turn out well. You won't imagine people loved it and few of them took a second serving too! I was so overwhelmed with the kind of response and appreciation I got for the salad, thought of sharing it with all my readers too. Also many asked for the recipe there, I have a similar salad recipe but the dressing is a little bit different so thought of posting it on my website.

Salads are a healthy way to eat good and nutritious food. And for a basic salad recipe what I do is just peep into my refrigerator and pantry for necessary ingredients like salad greens, dried fruits, any kind of nuts and lastly some acidic ingredient like vinegar or citrus juice, that's pretty much it. I start making delicious salads by combining friendly veggies that go well with each other and the flavors kind of marry with each other quiet well. I try many dressings doing my own version, sometimes, I like it, sometimes they take a ride into my kitchen sink. Coming to this dressing, it is simple homemade vinaigrette with vinegar, extra virgin olive oil, honey and Dijon mustard with little seasoning.

Source: My own
Cuisine: American
Prep time: 10 mins
Serves: 4
Ingredients:
6 leaves of Romaine Lettuce, torn
6 cherry tomatoes, halved or quartered
1 carrot, grated
½ red onion, chopped
1 seedless cucumber (optional)
1 pack seasoned bread croutons (optional)
Handful of toasted almonds/pinenuts/walnut(any)
dried cranberries for garnish

for dressing:
1 T distilled vinegar or lime juice
1 t dijon mustard
1 T honey
2 T extra-virgin olive oil
pinch of salt/ as per taste
1 tsp ground black pepper

Method:

1. Mix all the salad ingredients except nuts and croutons in a large bowl.
2. Prepare the dressing by first adding dijon mustard in vinegar juice whisk well.
3. Add freshly ground black pepper, salt, honey mix well.
4. Whisk vigorously while adding extra-virgin olive oil.
5. Spread over the salad, mix and cover it with plastic wrap and keep refrigerated.
6. When ready to eat top it with toasted almonds and croutons.


Tip: For crunchy salad, wash the greens and use a salad spinner to remove excess water out of the leaves or you can dab excess water in the leaves with a kitchen towel.

Click on Salads from my kitchen

Thursday, February 25, 2010

Chicken Fry with Green Peas Pulav Rice


Chicken fry inspired by Cinnamon trails


Chicken Fry

After getting inspired by seeing Cinnamon's mouthwatering Chicken fry the other day, I immediately planned the same for my Sunday lunch with green peas pulav. Today we had a treat having the chicken fry with some onion-cilantro-yoghurt's salad/raita with a can of cold diet pepsi. Yeah I have soda when I have something non-veg dish cooking, thats helps with digestion (my funda). Hope you will enjoy this nice, tasty and juicy chicken fry. Keeping it short and sweet though, here is my adapted version of Cinnamon's chicken fry followed by green peas pulav recipe.

Source: Adapted from Cinnamon trails
Cuisine: Andhra, South Indian
Prepration & Marinating time: 30 mins
Cooking time: 30 mins
Serves: 4
Ingredients:
1 pound of chicken thighs
1 medium size onion, sliced
2 green chillies, cut length-wise
2-inch cinnamon sticks (2)
4-5 cloves
2-3 bay leaves
1 tsp turmeric powder
1-2 tsp chilli/cayenne powder(paprika)
freshly greated nutmeg
1 tsp garam masala powder/spice mix
1 tsp jeera/cumin seeds
2 tbsp cooking oil
5-6 cashewnuts, halved and toasted for garnishing
1 tbsp chopped cilantro, for garnishing
salt as per taste
Grind to smooth paste:
1 small onion, roughly chopped
½ tomato, roughly chopped
2 green chillies, roughly chopped
1 inch ginger
2 cloves of garlic

Method:
  1. Clean the chicken and cut into bite size pieces or as per your requirements, you can keep the whole chicken thighs as it is.
  2. Marinate the chicken with turmeric powder, chilli powder, salt and the prepared paste for at least 15 mins.
  3. Heat oil in a large skillet, to this add the bay leaves, jeera/cumin seeds, cinnamon stick and cloves, fry for a minute.
  4. Add the sliced onions, green chillies and saute till the onions are translucent. To this add only the chicken pieces and fry them covered till they look cooked or for 10 mins.
  5. Afterwards add the remaining marinated paste, mix well and add the garam masala powder/spice mix, grate the nutmeg on top.
  6. Saute on medium high till all the moisture evaporates and the chicken pieces starts to caramelize, keep on frying till you get the desired color and flavor. Do check the spice level and salt, add if required.
  7. Garnish it with toasted cashew nuts and chopped cilantro.
  8. Serve with hot rice or any pulav/biryani.
Note:adjust your spice level accordingly while using green chillies or chilli powder.


Chicken fry served with green peas pulav


Green Peas Pulav

This green pea pulav recipe I learned from my Mother, who has inspired me in lot many ways and is a superb cook. I made a genuine attempt to bring in the same flavors as of my Mother but as is said, "Maa ka haath ka khane main kuch alag hi jaadu hain" But her formula works with ginger-garlic paste. This is a very simple and easy recipe to lay your hands on!

Source: My Mother
Cuisine: Indian
Prepration time: 10 mins
Cooking time: 20 mins
Serves: 4

Ingredients:
2 cups of Basmati rice, wash and soak for 10 mins
1 red onion, sliced
2 green chillies, cut lengthwise
½ cup fresh/frozen green peas
1 tbsp ginger-garlic paste
1 tsp jeera/cumin seeds
1-inch cinnamon stick
2-3 cloves
2-3 bay leaves
1 tsp garam masala powder/spice mix
1 cup whole milk or 2% milk
pinch of saffron strands (optional)
5-6 cashewnuts, halved
3 cups of water
salt as per taste

Method:
  1. Wash and soak the basmati rice for 10 mins approx.
  2. Heat oil in a medium size sauce pan, to this add the bay leaves, cinnamon stick, cloves jeera/cumin seeds and cashew nuts. Fry for a minute or till the nuts change to golden color and add the sliced onions, green chillies.
  3. Saute and add ginger-garlic paste, season with some salt, garam masala/spice mix, green peas and mix well all the ingredients. Lastly add milk to it.
  4. Stir in the rice and add water. For every 1 cup of uncooked basmati rice we have to add 2 cups of water, since we already added 1cup of milk to it we now add the remaining 3 cups of water.
  5. Stir, check the salt in it and cook on medium high heat uncovered for 10 mins and then cover and cook for another 5 mins.
  6. Once cooked fluff the pulav with fork and serve hot.

Chicken fry served with Green peas pulav, raita and lemon slices


Monday, November 23, 2009

Roasted Butternut squash with Rosemary and Balsamic Vinegar


Butternut squash tossed in rosemary, balsamic vinegar

This is my first indulgence cooking with it, whom am I referring to? Its none other than Butternut squash. It is a winter vegetable and comes from the gourd family. It has a hard, thick skin and it is filled with seeds. It can range in size from 8 to 12 inches long, and about 3 to 5 inches wide, weighing up to 3 pounds. The color of the Butternut squash ranges from a yellow to a light tan. Inside, the flesh is orange and has a sweet flavor. Available in early fall through winter, you will want to choose a squash that is heavy with few blemishes and moldy spots.

Storage: Butternut squash can be stored longer than summer squashes because their skin is so hard and thick. Store in a cool dry place for at least a month. If the squash has been cut into pieces, then wrap in a plastic wrap and refrigerate up to 5 days.

Nutritional Qualities: The following qualities are available in one cup of mashed squash: 80 calories, 2 grams protein, 1 gram fat, 18 grams carbohydrates, with riboflavin, iron, Vitamins A and C.

Source: Seeds of Knowledge


Roasted Butternut Squash with Rosemary and Balsamic Vinegar

Recipe Source: Kalyn's Kitchen
Cuisine: American Cuisine (South Beach Diet)
Preparation time: 15 minutes
Cooking time: 35-40 minutes

Ingredients:
1 medium sized butternut squash, about 6 cups of peeled, de-seeded and cut into cubes
2 tbsp extra virgin olive oil
1 tbsp + 1 tsp balsamic vinegar

1 tsp rosemary, finely chopped

kosher salt as per taste

freshly ground black pepper


Method:
  • Preheat oven to 400°F [200°C]. Cut the butternut squash into half and peel it with a knife (do not use peeler, it tough to work with). Cut into bite size pieces or you can use ready made store brought.
  • Toss with extra virgin olive oil, kosher salt, rosemary, balsamic vinegar and freshly ground black pepper. Spread them single layered either on a cookie sheet or large dish.
  • Roast until squash turns soft and lightly caramelized about 40 minutes in the oven.
  • Remove from oven, toss it with 1 teaspoon of balsamic vinegar, freshly ground black pepper and kosher salt. Serve hot.
  • Kalyn says "This is also excellent made ahead and reheated. For a holiday like Thanksgiving where there are lots of demands on the oven, it could be cooked early in the day and kept warm in a crockpot while other things bake"
Thanks Kalyn for this wonderful recipe, both of us enjoyed eating it hot and on next day too! This makes a great side dish for Thanksgiving!

Happy Thanksgiving to everyone!!

Friday, August 28, 2009

Here She Is......


Its been a while I was away from my blog/kitchen..... Well I have a good reason to be away. There is a new member added in our family "Padma's Kitchen"

I am so happy and delighted to introduce "Our Little Princess - Anshika" She enlightened our lives on July 28th 2009.

I will be back to blogging world once I get adjusted to my new responsibility.


Sunday, July 5, 2009

Introducing my kitchen

They say the kitchen is the focal point of the household, and that's the way it is in our home too. My actual interest in cooking started after coming to USA, as I had lot of time to invest in this new hobby. I was introduced to the food blogs by Sharmi of Neivedyam, a dear friend and well wisher. Soon I was hooked to food blogs like Sailu’s Food, Mahanandi, Akshayapatra, Kalyn’s Kitchen, Chubby Hubby and few others to mention.

Cooking happened to me when I was a kid helping my mother in kitchen, though I was not experienced in bringing the delicious mouthwatering taste as my mother did, after all its "Maa ka haath ka khana". Most of the recipes, cooking tips and tricks I learn't from my Mother, few from my Mother-in-law, my cousins, friends, cookbooks, cook shows, Sanjeev Kapoor's Khana Khazana and internet.
My hubby encouraged and inspired me to start my own collection of recipes. So this is my first trial to create a virtual kitchen, where I can share my interest for life’s tastier side with others.

Padma’s Kitchen is a book of my-tried-out recipes; you will find tastes from India especially from Andhra, Maharashtra, South and North Indian recipes with a fusion of east and west, and few International cuisines too. I hope you will enjoy trying them too. Comments left on the blog go directly to the email, and are always appreciated. Feel free to write in.

This Kitchen is seasoned with *Love*

Monday, March 30, 2009

Through my lens ~ Natural Sponge

Loofah Sponge~ Berakaya peechu in telugu


Wondering what is this? and why for click event?

This month's CLICK Event theme is Wood. Portray in any form shape and size. So I thought why not this natural sponge which we use as a bathing sponge, brisk rubbing with Loofah sponge will exfoliate the skin and stimulate circulation.

We call it as berakaya peechu in telugu. It is made from drying out the biggest ridge gourds or chinese okra to get seeds for planting next year. The flesh gets dried out and the gourd is left with fibrous sponge like texture and ready to use. To know more details check this link
How to make Loofah sponge

Sending my entry to
Click event-Wood hosted by Jugabandi

Materials used:
Ridge gourd, Natural Loofah sponge from India, placemat and plenty of natural light
Camera:
Sony Cybershot DSCP100.
About photo: taken in dim sunlight as it was raining and without flash.

Settings: adjusted the brightness and contrast.

Friday, March 27, 2009

Happy Ugadi

I wish all my visitors, readers and foodies a Happy Ugadi and Gudi Padwa.

Ugadi (Telugu: ఉగాà°¦ి, Kannada: ಯುಗಾದಿ from yuga+aadi, yuga is era, aadi means start. The start of an era) is the new year's day for the people of the Deccan region of India. While the people of Andhra Pradesh and Karnataka use the term Ugadi for this festival, the people of Maharashtra term the same festival, observed on the same day, Gudi Padwa. (source: wikipedia)

Ugadi to the Telugu speaking people marks a beginning of a new year in which nature is in full bloom, symbolizing regeneration and celebrating the season’s freshness. But the most unique and significant tradition of Ugadi is beginning the new year with savoring a unique flavored pachadi (chutney) that epitomizes the spirit of Ugadi called "Ugadi Pachadi",with sweet,sour,pungent, salty, hot and bitter tastes (shadruchulu or six tastes). This chutney or sauce is a symbolic reminder of the myriad facets of life in a sense prepares us for the year ahead.

Ugadi Pachadi

Ugadi Pachadi is made in different ways in different homes and does not taste same. Every house has its own unique taste. I made Ugadi Pachadi by mixing:
1 raw mango chopped
1 t methi seeds powder(substituting Margosa Flowers-neem flowers)
a pinch of red chilli powder
2 T jaggery/bellam
2-3 T tamarind paste
a pinch of salt
Ugadi Pachadi, Payasam and Mamidikaya Pulihora

Recipe for Mamidikaya Pulihora you can check my Mamikaya Annam

Its been a long long time I was away from blogging and I have a good reason to be away! Will let you know this Summer ;)

Padma

Monday, December 15, 2008

Blogging out Hunger~We Can't Let This Bank Fail!

Bloggers unite to Fight Hunger in New Jersey

My dear friend Deb of Jersey Bites invited me to join in this campaign she is coordinating on behalf of the Community FoodBank of New Jersey — the largest food bank in the state. As you are probably well aware, the Food Bank is in desperate need of donations this holiday season. With bare shelves and demand for food among state residents far out pacing supply, the FoodBank is in danger of being unable to meet the needs of New Jersey’s hungry.

More than 35 million Americans, including 12 million children, either live with or are on the verge of hunger.


One out of every five New Jersey families does not earn enough to afford the basic necessities – housing, food and child care – although 85 percent of these households have at least one family member who is working.

In New Jersey alone, an estimated 250,000 clients will be seeking sustenance this year from the state's food banks. But recently, as requests for food assistance have risen, food donations are on the decline, leaving food bank shelves almost empty and hungry families waiting for something to eat.


The situation is dire, no more so than at the Community FoodBank of New Jersey (CFBNJ), the largest food bank in the state, where requests for food have gone up 30 percent, but donations are down by 25 percent. Warehouse shelves that are typically stocked with food are bare and supplies have gotten so low that, for the first time in its 25 year history, the food bank is developing a rationing mechanism.

As the state's key distributor of food to local banks – serving more than 500,000 people a year and providing assistance to nearly 1,700 non-profits in the state – the stability of replenishment of the CFBNJ is essential to ensuring that individuals in need have access to food.

To really understand the serious need for donations, just click on the link below and take a minute to view the video.


If everyone could just do a little, it would help those in need a lot. To help, people can:

  • Make a monetary contribution: Visit www.njfoodbank.org
  • Donate food: Drop off a bag of food at your local food pantry.
  • Organize a food drive: We can help explain the logistics of starting a food drive. Just call 908-355-FOOD.
  • Help "Check Out Hunger:" Look for the "Check Out Hunger" coupons at your local supermarket and donate. No donation is too small!
  • Please look for the $1, $3, & $5 donation slips at A&P, Food Basics, Foodtown, Genuardi’s, Kings, Pathmark, ShopRite, Super Fresh and Wegmans. 100% of your generous donation in the stores or at http://www.checkouthungernj.org/ will come back to the FoodBank and make a real difference in the COH_Tickets_giffight against hunger in New Jersey.
Over 100 bloggers have united to fight hunger across the Garden State. Together we can fight against 'HUNGER'.

We’re hoping our efforts will compel everyone to do something, anything, to help.

Blogging out Hunger~We Can't Let This Bank Fail!

Bloggers unite to Fight Hunger in New Jersey

My dear friend Deb of Jersey Bites invited me to join in this campaign she is coordinating on behalf of the Community FoodBank of New Jersey — the largest food bank in the state. As you are probably well aware, the Food Bank is in desperate need of donations this holiday season. With bare shelves and demand for food among state residents far out pacing supply, the FoodBank is in danger of being unable to meet the needs of New Jersey’s hungry.

More than 35 million Americans, including 12 million children, either live with or are on the verge of hunger.


One out of every five New Jersey families does not earn enough to afford the basic necessities – housing, food and child care – although 85 percent of these households have at least one family member who is working.

In New Jersey alone, an estimated 250,000 clients will be seeking sustenance this year from the state's food banks. But recently, as requests for food assistance have risen, food donations are on the decline, leaving food bank shelves almost empty and hungry families waiting for something to eat.


The situation is dire, no more so than at the Community FoodBank of New Jersey (CFBNJ), the largest food bank in the state, where requests for food have gone up 30 percent, but donations are down by 25 percent. Warehouse shelves that are typically stocked with food are bare and supplies have gotten so low that, for the first time in its 25 year history, the food bank is developing a rationing mechanism.

As the state's key distributor of food to local banks – serving more than 500,000 people a year and providing assistance to nearly 1,700 non-profits in the state – the stability of replenishment of the CFBNJ is essential to ensuring that individuals in need have access to food.

To really understand the serious need for donations, just click on the link below and take a minute to view the video.


If everyone could just do a little, it would help those in need a lot. To help, people can:

  • Make a monetary contribution: Visit www.njfoodbank.org
  • Donate food: Drop off a bag of food at your local food pantry.
  • Organize a food drive: We can help explain the logistics of starting a food drive. Just call 908-355-FOOD.
  • Help "Check Out Hunger:" Look for the "Check Out Hunger" coupons at your local supermarket and donate. No donation is too small!
  • Please look for the $1, $3, & $5 donation slips at A&P, Food Basics, Foodtown, Genuardi’s, Kings, Pathmark, ShopRite, Super Fresh and Wegmans. 100% of your generous donation in the stores or at http://www.checkouthungernj.org/ will come back to the FoodBank and make a real difference in the COH_Tickets_giffight against hunger in New Jersey.
Over 100 bloggers have united to fight hunger across the Garden State. Together we can fight against 'HUNGER'.

We’re hoping our efforts will compel everyone to do something, anything, to help.

Monday, November 17, 2008

American Butter Corn

Its been a long time I am updating my blog. We/I took a break and life was pretty busy, moving to a new apartment and settling down took us two tiresome weeks. Excited about our new apartment, it has a balcony.... and can't wait for Summer!!

Any one who recently visited India will know about this famous theater snack which is so popular amongst all the ages. Yes, I am talking about American Butter Corn. is famous in most of the movie theaters all across India especially in Andhra Pradesh. Some how I managed to bring that taste here, I make this for prasadam/offering to Saibaba. This recipe has less fat from one tbsp butter, It is a good source of fiber as we make from fresh corn and here goes the simple recipe.


American Butter Corn
Recipe Source: My Own
Cuisine: Global
Preparation time: 10 minutes
Cooking time: 10 minutes
Makes: 4-5 people

Ingredients:
3-4 fresh sweet corn
2 tbsp fresh parsley, chopped
freshly ground black pepper
1 tsp red chilli powder
1 tbsp butter
salt as per your taste
4 cups of water

Method:
  • Bring 4 cups of water to boil, to this add salt. Break fresh corn into two or three pieces and boil the cobs for 10 mins.
  • Peel corn from the cob.
  • Take a saute pan, heat it on medium high, add butter to that. Now add corn, freshly ground black pepper, pinch of salt and chilli powder.
  • Mix well so that excess water is evaporated, at the end mix in some chopped parsley or cilantro. You can play with the flavours here by adding different kinds of herbs and spices.

Monday, October 27, 2008

Wish you a Happy Diwali


Hope this Diwali fills your year with joy and continues to brighten the rest of your life


I wish all my friends, my readers a very
Happy Diwali.


Festival Food ~ Chivda

festival food ~ Chivda
Its been a long time I was away from blogging. There were few things to attend first and blogging took a back seat. Diwali is here so I took this opportunity to write a post related to Festival Food. Festivals are always celebrated with much zeal, pomp and show in Bombay. During Diwali when you step into that multi-storied apartments you can smell, shankarpala, karanji, chakali, ladoo etc etc from everyone's kitchen.

'Faraal' ~ Festival food as is called in Marathi is made with so much of love and passion and distributed to our friends and relatives on the day after Diwali. All the three of us used to help my mother in the preps of these fabulous Faraal and some times used to eat the raw dough made for
Shankarpala.

Chivda is a traditional Maharashtrian snack made for Diwali and is called by many different names across India. Chivda is a combination of toasted rice flakes, roasted peanuts, cashews, dalia and any of your favourite ingredients. In general it is a mixture of so many different flavours and definitely reflects the diversity of cultures in India, now here is the recipe. Chivda tastes good if you make it with thin poha.

Chivda
Recipe Source: My Mother
Cuisine: Maharashtrian Cuisine ~ Indian
Preparation time: 10 minutes
Cooking time: 30 minutes
Makes: 20-25 people

Ingredients:
10 Cups thin rice flakes, thin poha/atukullu
¾ cup peanuts/chanakayalu
¾ cup dalia/ chutney dal/putnalu
¾ cup cashewnuts/kaju/jeedipappu
½ cup raisins/khishmish
¼ cup curry leaves/kadipatta/karvepaku
¼ dried coconut flakes/ sukha khobra/endu kobbari
3 tbsp toasted fennel seeds/badi sop
1 tsp red chilli powder/karam
2 tsp turmeric/haldi/pasupu
4-5 tsps sugar
2 tsps salt as per your taste
5 tbsp cooking oil

Method:
  • Sift thin poha in batches to remove any powdered flakes, otherwise it may result in powdered Chivda. It is always good to sift them through bigger filter to get rid of small powered poha flakes.
  • I fry them batch wise in a large kadai. Heat 2 tbsp of cooking oil, add 1 tsp of turmeric and immediately add 5 cups of rice flakes/poha. Start stirring so that all the poha flakes are evenly covered with oil and turmeric. Fry them on medium flame and make sure not to burn poha by constantly stirring and folding the poha flakes.
  • Remove once they are done and repeat the same steps for the second batch. Place them in a big mixing bowl or on a large sheet of paper.
  • Now fry individually in a teaspoon of oil roast cashew nuts, peanuts, dalia and curry leaves. Pour them over the fried poha flakes.
  • Dry toast coconut flakes and fennel seeds and add it to fried poha flakes.
  • Lastly add raisins/ kishmish, red chilli powder, salt and sugar and mix them properly with the other ingredients and fried poha flakes, check for salt and sugar. Take special care not to break the poha, when you mix it. You have to handle them delicately.
  • Box it in an air-tight container and Chivda is ready to serve/ share.

I cannot end this post without mentioning about the recent loss of our dearest family member, my brother-in-law on 7th Oct 2008. This dedication goes to him as he loves Chivda so much.

"There will always be the presence of his absence and it can never be filled"
May his soul rest in peace, Amen!

Monday, October 6, 2008

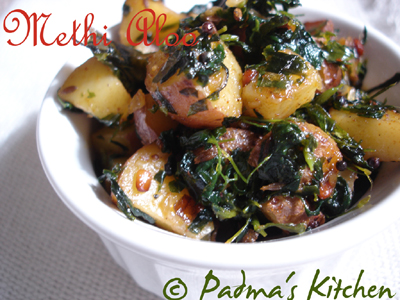
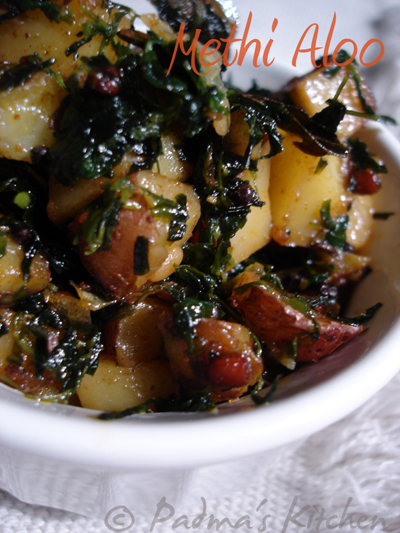
Methi Aloo

Did I tell you that Potatoes are my favourite roots of all. I love to have them with almost anything. As it is known to all that potatoes are rich in starch and carbohydrates and many are watching their carb consumption. I must say they are even keeping me away from blogging, no I was just kidding! But I agree that they make me dozzZzy Zzzz Zzzz ZZz!!!

Frying potatoes with methi leaves for me is a Maharashtrian cuisine. I do know that Methi Aloo might be some north-indian cuisine too. I always like this with hot steamed rice and dal or chapatis. Methi leaves used here in this recipe are picked straight from my window garden. I will update my garden photos shortly.

My window garden, Fenugreek/Methi


Medicinal information on Fenugreek leaves
Use a lot of fenugreek (methi) in your culinary preparations. Why? For the simple reason that it is so healthy. This wonder herb, a very popular vegetable in the Indian cuisine is a nature’s boon to mankind. Besides, it is so appetizing, light and dry. Rich in protein, calcium, phosphorus and iron in their natural forms, its mineral and vitamin contents are also very high and this is easily assimilated by our body. This is extracted from beauty and personal grooming. For more on information on Methi leaves, its medicinal benefits and home remedies do check the informational blog here beauty....


Methi Aloo

Recipe Source: Friend

Cuisine: Maharashtrian Cuisine ~ Indian
Preparation time: 20 minutes
Cooking time: 30 minutes

Ingredients:
6-7 red skin potatoes, diced and cubed into small pieces
1 small bunch of
fenugreek leaves/methi leaves/menthaaku
1 tsp red chilli powder/cayenne powder/karam
a pinch of turmeric/haldi/pasupu
for tempering/seasoning:
2 tbsp cooking oil
1 tsp cumin/jeera/jeelakara
1 tsp mustard/rai/avaalu
1 tsp black gram/urad/minapappu
5-6 curry leaves

Method:

  • Clean and roughly chop the methi leaves/fenugreek leaves.
  • Heat oil in a frying pan or kadai. Add all the seasoning ingredients. Fry for a minute and then add the diced and cubed red potatoes with its skin on.
  • Fry for 15-17 minutes or till the potatoes are cooked. Sprinkle some salt, turmeric and cayenne pepper/karam and stir so that all the spices are mixed well.
  • Lastly add fenugreek leaves/methi leaves, let it cook for 3-4 mins and stir so that leaves are mixed well.
  • Serve it with hot steamed rice or rotis/Indian flatbread.
I am sending this to Susan of The Well Seasoned Cook, Weekend Herb Blogging is brainchild of Kalyn from Kalyn's Kitchen. Do not forget to check the new rules on weekend herb blogging

More tasty Aloo(potato) recipes from my blog:
Jeera Aloo
Punjabi Gobi Aloo muttar

Tuesday, September 23, 2008

My favourite Apple Cake!!!

There is nothing more soothing than the aroma of
freshly baked apple cake with cinnamon!!

Fall has arrived and so does the season of Apples arrive. I first tasted this Apple cake at one of my friends baby shower. As a foodie you know, without much hesitation I asked my friend the recipe for the fabulous cake. Since then I have been baking this cake for more than 3 years now. This recipe is for a keepsake, tried and tested for sure! Coz it won't betray you nor abandon you.

I baked and gifted this cake to most of my friends and they can verdict about its taste and texture. I often bake them with Gala Apples when I don;t get hold of Green Granny Smith Apples. I sometimes bake it in a tube pan, sometimes in a bundt pan, sometimes in round and sometimes in a rectangle pan. It is totally up to you! So I can say this is such a versatile recipe and can accommodate in any kitchen.

here is my slice of cake!


Apple Cake

Recipe Source: Friend

Cuisine: International Cuisine ~ American
Preparation time: 25 minutes
Cooking time: 50 - 80 minutes

Ingredients:
For Cake:
Butter, for greasing pan
3 cups all-purpose flour
2 cups sugar (you can reduce to 1½ cup)
1 tsp baking soda
¼ tsp salt
1 tbsp cinnamon powder (I use 1 tsp)
3 eggs
1½ cups vegetable oil
¼ cup orange juice
1 tbsp vanilla extract
3 cups Apples, cored, peeled and finely chopped (pref. Granny Smith apples)
1 cup shredded coconut
1 cup chopped almonds (any nuts)
For Sauce:
½ cup (1 stick) butter
1 cup sugar (you can reduce to ¾ cup)
½ cup buttermilk
½ teaspoon baking soda

Method:
  • Preheat the oven to 325°F[165°C]. Generously grease a tube pan.
  • For cake: In a large bowl, combine sugar, eggs, oil, orange juice, flour, baking soda, salt, cinnamon and vanilla extract; and mix well.
  • Fold apples, coconut, and pecans into batter.
  • I used a Bundt cake pan and a normal round cake pan for baking this cake.
  • Pour the batter into the prepared pan and bake until a tester comes out clean, about 1½ hours.
  • Shortly before the cake is done, make the sauce.
  • For Sauce: Make sauce in a deep pan else it will overflow when it starts boiling.
  • Melt the butter in a large saucepan, stir in sugar, buttermilk, and baking soda, and bring to a good rolling boil, stirring constantly.
  • Boil for 1 minute. Pour the sauce over hot cake as soon as you remove it from oven.
  • Let stand 1 hour, then turn out onto a rack to cool completely.Cut into pieces and serve. It tastes better when served cold.
  • I bake my cake a little longer to get a nice, yummy crust. I love it that way!

Sending this photo to Click-Sep 2008

Wednesday, September 17, 2008

Through My Lens ~ Few guessed it right


Through my lens ~ guess......

Remember I asked 10 days back about the photo I posted in Through my lens ~ Guess! Yeah.... those are peach pits/seeds! Many thought they were Walnuts, Almonds, Akhrot etc etc...

Only Aparna, Sia and Rachel were able to guess it correctly! Now here is a close up look at these Peach Pits.


Peach Pits

Coming soon Peach Jam, stay tuned!!!


Wednesday, September 10, 2008

Chicken 65 ~ Indian Chicken Nuggets

Chicken 65 is one of my favourite comfort food when it comes to non vegetarian. I learned it from my cousin sister. Both my cousins cook wonderful, delicious and mouth watering non vegetarian (mostly chicken, fish, seafood and goat or lamb) dishes. Gosh! I have so much to learn from them.
So here goes the recipe for this mouth watering Chicken Appetizer.

Please don't ask me why it is called Chicken 65? not that I made exactly 65 pieces of chicken. Vague, isn't it? I will let you all know once I find it out.


Chicken 65 ~ Indian Chicken Nuggets

Recipe Source: Satya Akka

Cuisine: South Indian Cuisine ~ Andhra
Preparation time: 25 minutes
Cooking time: 30 minutes

Ingredients:
3 pounds (1.4 kgs) tender chicken breasts
boneless, skinless and cubed into 1 inch pieces
3 tsp red chilli powder (adjust as per your spice level)
Juice of half lime or lemon
freshly ground black pepper
salt as per taste
for coating/batter:
½ tsp ajinomoto salt
¾ cup corn flour
2 tsp corn starch
2 tbsp corn meal (for crunchiness)
½ cup water
oil for deep frying
for garnishing:
roughly chopped onions and chopped cilantro

Method:
  • Clean and cut chicken into one inch cubes and marinate with the first five ingredients in the list. Marinate overnight or at least 2 hours in the refrigerator.
  • Prepare batter with rest of all ingredients from the list, add enough water to make a smooth batter similar to pancake consistency.
  • Pour the batter over marinated chicken cubes, mix nicely so that all pieces are coated well. Deep fry the chicken pieces batch wise.
  • Drain excess oil on a paper towel and garnish with freshly chopped onions and cilantro. Serve hot!!!
  • The leftover pieces (if any) can be stored in a ziploc bag and heat it in oven at 350°F [176°C] or in microwave on high for 1 minute depending on the leftover quantity.
Related Posts with Thumbnails