Tuesday, September 23, 2008

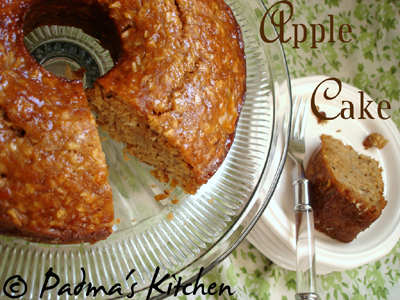
My favourite Apple Cake!!!

There is nothing more soothing than the aroma of
freshly baked apple cake with cinnamon!!

Fall has arrived and so does the season of Apples arrive. I first tasted this Apple cake at one of my friends baby shower. As a foodie you know, without much hesitation I asked my friend the recipe for the fabulous cake. Since then I have been baking this cake for more than 3 years now. This recipe is for a keepsake, tried and tested for sure! Coz it won't betray you nor abandon you.

I baked and gifted this cake to most of my friends and they can verdict about its taste and texture. I often bake them with Gala Apples when I don;t get hold of Green Granny Smith Apples. I sometimes bake it in a tube pan, sometimes in a bundt pan, sometimes in round and sometimes in a rectangle pan. It is totally up to you! So I can say this is such a versatile recipe and can accommodate in any kitchen.
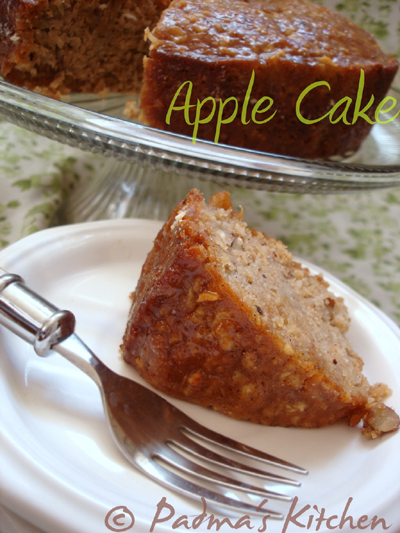
here is my slice of cake!


Apple Cake

Recipe Source: Friend

Cuisine: International Cuisine ~ American
Preparation time: 25 minutes
Cooking time: 50 - 80 minutes

Ingredients:
For Cake:
Butter, for greasing pan
3 cups all-purpose flour
2 cups sugar (you can reduce to 1½ cup)
1 tsp baking soda
¼ tsp salt
1 tbsp cinnamon powder (I use 1 tsp)
3 eggs
1½ cups vegetable oil
¼ cup orange juice
1 tbsp vanilla extract
3 cups Apples, cored, peeled and finely chopped (pref. Granny Smith apples)
1 cup shredded coconut
1 cup chopped almonds (any nuts)
For Sauce:
½ cup (1 stick) butter
1 cup sugar (you can reduce to ¾ cup)
½ cup buttermilk
½ teaspoon baking soda

Method:
  • Preheat the oven to 325°F[165°C]. Generously grease a tube pan.
  • For cake: In a large bowl, combine sugar, eggs, oil, orange juice, flour, baking soda, salt, cinnamon and vanilla extract; and mix well.
  • Fold apples, coconut, and pecans into batter.
  • I used a Bundt cake pan and a normal round cake pan for baking this cake.
  • Pour the batter into the prepared pan and bake until a tester comes out clean, about 1½ hours.
  • Shortly before the cake is done, make the sauce.
  • For Sauce: Make sauce in a deep pan else it will overflow when it starts boiling.
  • Melt the butter in a large saucepan, stir in sugar, buttermilk, and baking soda, and bring to a good rolling boil, stirring constantly.
  • Boil for 1 minute. Pour the sauce over hot cake as soon as you remove it from oven.
  • Let stand 1 hour, then turn out onto a rack to cool completely.Cut into pieces and serve. It tastes better when served cold.
  • I bake my cake a little longer to get a nice, yummy crust. I love it that way!

Sending this photo to Click-Sep 2008
Wednesday, September 17, 2008

Through My Lens ~ Few guessed it right


Through my lens ~ guess......

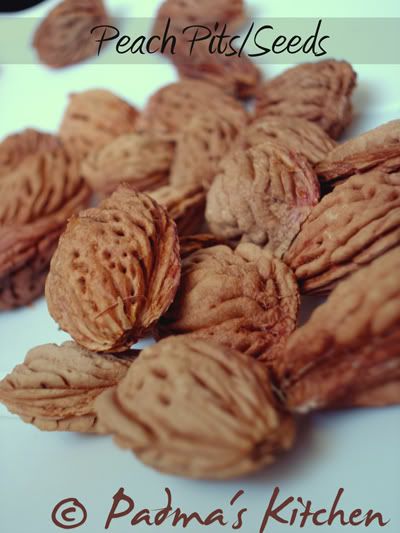
Remember I asked 10 days back about the photo I posted in Through my lens ~ Guess! Yeah.... those are peach pits/seeds! Many thought they were Walnuts, Almonds, Akhrot etc etc...

Only Aparna, Sia and Rachel were able to guess it correctly! Now here is a close up look at these Peach Pits.


Peach Pits

Coming soon Peach Jam, stay tuned!!!


Wednesday, September 10, 2008

Chicken 65 ~ Indian Chicken Nuggets

Chicken 65 is one of my favourite comfort food when it comes to non vegetarian. I learned it from my cousin sister. Both my cousins cook wonderful, delicious and mouth watering non vegetarian (mostly chicken, fish, seafood and goat or lamb) dishes. Gosh! I have so much to learn from them.
So here goes the recipe for this mouth watering Chicken Appetizer.

Please don't ask me why it is called Chicken 65? not that I made exactly 65 pieces of chicken. Vague, isn't it? I will let you all know once I find it out.


Chicken 65 ~ Indian Chicken Nuggets

Recipe Source: Satya Akka

Cuisine: South Indian Cuisine ~ Andhra
Preparation time: 25 minutes
Cooking time: 30 minutes

Ingredients:
3 pounds (1.4 kgs) tender chicken breasts
boneless, skinless and cubed into 1 inch pieces
3 tsp red chilli powder (adjust as per your spice level)
Juice of half lime or lemon
freshly ground black pepper
salt as per taste
for coating/batter:
½ tsp ajinomoto salt
¾ cup corn flour
2 tsp corn starch
2 tbsp corn meal (for crunchiness)
½ cup water
oil for deep frying
for garnishing:
roughly chopped onions and chopped cilantro

Method:
  • Clean and cut chicken into one inch cubes and marinate with the first five ingredients in the list. Marinate overnight or at least 2 hours in the refrigerator.
  • Prepare batter with rest of all ingredients from the list, add enough water to make a smooth batter similar to pancake consistency.
  • Pour the batter over marinated chicken cubes, mix nicely so that all pieces are coated well. Deep fry the chicken pieces batch wise.
  • Drain excess oil on a paper towel and garnish with freshly chopped onions and cilantro. Serve hot!!!
  • The leftover pieces (if any) can be stored in a ziploc bag and heat it in oven at 350°F [176°C] or in microwave on high for 1 minute depending on the leftover quantity.

Simply Egg Mushroom Rolls


Simple and spicy Egg Mushroom Rolls

Ever since Usha of My Spicy Kitchen blogged these beauties I was very eager to make them. Simply egg mushroom rolls is an original recipe from What's for lunch honey, by Meeta. Egg Mushroom Rolls can be great for breakfasts, brunch ideas and anything to munch in between. We rather had it for dinner along with a side dish Roasted Butternut Squash with Rosemary and Balsamic Vinegar.


Simply Egg Mushroom Rolls

The recipe is very simple and easy and can be read from the above blogs. I used four eggs instead of six, beat it, seasoned it with freshly ground black pepper and salt and made four omelettes. For the filling, I diced some baby portabella mushrooms discarding their stems, because of their woody texture. Fried the diced baby portabellas in a tablespoon of butter with cumin/jeera. Added little chilli powder, salt and garam masala powder. Stuff this mushroom filling into the prepared egg crepes or omelettes, garnish it with chopped cilantro or parsley. Thats it!

Thank you Meeta for this wonderful recipe!


My Bite: Egg Mushroom Rolls with Butternut Squash


Yesterday night we had Roasted Butternut Squash with simply Egg Mushroom rolls.

Sunday, September 7, 2008

Through My lens ~ Guess!


Can you guess what are these?
Let me know what do you think about the above picture


About photo: taken in bright sunlight without flash.
Camera: Sony Cybershot DSC-P100 5.1 mp

"Through my lens" is a new series of food photography. An idea to portray beautiful things I indulge in every day life and share the moments with my friends and visitors to my blog. This series will primarily focus on food and things related to it.

Lunch Box Pasta ~ Penne in creamy tomato sauce


Penne in Creamy Tomato Sauce

If you ask me which is your addictive new cuisine? without any second thought I will say Italian! Yeah I became more comfortable trying Italian cuisine after coming to this country. Thanks to Giada, I learned to cook delicious and wonderful Italian recipes from Food TV.

But I admit that I don't like much cheese in my food. So I adjust accordingly and make paste with penne being one of my favorite shape amongst all. This is one yummy recipe that I tend to make again and again, week after week and never lets me down. I make this weekly once for JB and he loves to take in his Lunch box, thence the name!


Penne in Creamy Tomato Sauce


Recipe Source: My Own
Cuisine: Fusion Food, Italian Cuisine
Preparation time: 20 minutes
Cooking time: 15 minutes

Ingredients:
2 cups pasta, uncooked
1 cup pasta sauce, store brought(I use Tuttoroso or Ragu brand)
1 shallot(onion), diced thinly
3-4 cloves of garlic, minced
2 tbsp roasted red pepper homemade or store bought
2 tbsp parsley, freshly chopped
¼ cup light cream or half-n-half
½ tsp red chilli powder/karam (optional)
¼ cup freshly grated parmesan cheese
a bunch of fresh basil, chopped
2 tbsp extra-virgin olive oil
freshly ground black pepper
salt as per taste
8 cups water

Method:

  • Cook pasta as per the instructions on the packet.
  • Take a large sauce pan, heat oil and sauté shallots and garlic. Add salt to sweat the shallots and season it with freshly ground black pepper.
  • Now add pasta sauce, chilli powder, salt and let it cook for a minute. Then add freshly chopped parsley, chopped roasted peppers and cream or half-n-half to it. Let it cook for a couple of minutes.
  • Taste for salt and pepper, add the cooked pasta, mix well. Add chopped basil and top it with freshly grated parmesan cheese.
More Pasta recipes:
Penne with Parsley Pesto and Zucchini
Orzo with lemon, feta, cranberries and methi sprouts (Pasta salad)
Spaghetti with roasted pepper medley

Friday, September 5, 2008

Brussels Sprouts Stir fry


Admit it, when was the last time you ate Brussels sprouts? I was indulged in these beautiful cabbage buds (to me!) one year back when I saw at some one's blog and thought of giving it a try. Though I was skeptical initially, but started to cook with Brussels sprouts quiet often and now it has become one of our family favorites. JB loves having Brussels sprouts with chapatis, rotis or rice and dal.

Brussels sprouts can be cooked in many ways. Some like to eat it raw, some boil it, some roast it, some stir fry it while some bake it. There are many yummy recipes available in the food blogosphere! But only one basic formula: Treat this veggie as you do with cabbage and it will justify its presence in the dish you make with it.

Many people like to have it when the Brussels sprouts are well cooked. Check this article on San Francisco Chronicle I bet you will go back to this veggie again and again! I am making Brussels sprouts stir fry with the spice mix I blogged last week. Now sit back and enjoy the show....oops recipe!


Brussels Sprouts Stir fry with peanut garlic spice mix


Recipe Source: My Own
Cuisine: Fusion Food
Preparation time: 10 minutes
Cooking time: 20-25 minutes

Ingredients:
12-15 Brussels sprouts
1 shallot(onion), diced thinly
2 tbsp roasted red pepper homemade or store bought
2 tbsp peanut garlic spice mix
salt as per taste
½ tsp red chilli powder/karam (optional)
for seasoning/temepering/tadka/poppu:
1 tsp cumin/jeera/jeelakara
1 tsp mustard seeds/rai/avaallu
2-3 dried red chillies, roughly torn into two pieces
3-4 curry leaves
2 tbsp olive oil

Method:
  • Clean the brussels sprouts, remove any loose leaves and chop them into bite size.
  • Heat oil in a large sauté pan, add all the ingredients under tempering list and fry for a minute. Turn heat to medium high, add diced shallots, hit some salt and this will sweat the shallots. Add roughly chopped roasted red pepper and diced brussels sprouts.
  • Sauté on high for about 10 minutes, if required sprinkle some water and cook it till done.
  • Lastly add the peanut garlic spice mix and cook for another two minute until it is mixed well.
  • Serve with rotis or rice.

Thursday, September 4, 2008

Ganesh Chaturthi Prasadam~ Pala Thalikalu


Ganesh Chaturthi celebrated in my home

Ganesh Chaturthi was celebrated on 3rd Sep 2008 all over India and this year also we celebrated this festival with full devotion and joy in the company of our friends and family. Enjoyed all the tasty prasadams and naivedyam offered to Lord Ganesha. I already blogged my last year's celebrations, if interested have a look.


But what is unique this year is I made Ganesh Idol out of all-purpose flour (maida) and decorated with the throne and ornaments brought from India.


For this occasion I made Kudumullu, Uppu Undrallu, Semiya payasam, Chakkari Pongal, and Pala Thalikalu as prasadam/naivedyam (food offerings to God). I already blogged recipes for Kudumullu, Uppu Undrallu, Semiya Payasam and Chakkari Pongal/ Pramanannam. I am blogging only Pala Thalikalu here in this post.

Pala thalikalu aka pammulu payasam is a milk pudding with rice dough strings shaped in small snake like shapes thence the name! This recipe is my newest attempt to make pala thalikalu and I successfully made them. But only thing is many strings got melted and only few left so I captured this picture for you to understand what I made. Not bad though, for first attempter!


Pala Thalikalu - Prasadam for Ganapati
Recipe Source: My Friend
Cuisine: South Indian, Andhra
Preparation time: 20 mins
Cooking time: 30 mins

Ingredients:
4 cups milk (whole or 2%)
1 cup rice flour/biyappu pindi
1-
½ cup sugar
½ cup grated coconut/kobbari, fresh or frozen
4 tbsp sesame seeds/nuvvulu/til, toasted and crushed
1 tsp cardamom powder/elaichi powder
few strands of saffron/kumkuma puvvu
2 tbsp crushed nuts like cashew,almonds and pistachios
1 tbsp clarified butter/ghee/neyi
2 cups water

Method:
  • Boil water in a big, deep vessel/saucepan. Add ghee to it and stir in sifted rice flour.
  • Stir in with a wooden spoon and see that there are no lumps formed. Once all the rice flour is mixed well with water switch off the gas. Cover and let it cook.
  • Knead the dough while it is still hot, wet your hands with water and divide the dough into small 2 inch balls and later shape into long strings. Keep aside and let it dry for 10-15 minutes.
  • Meanwhile boil four cups of milk, once it comes to a full boil add sugar, cardamom powder, saffron and let all the flavor blend well on medium heat for about 10 minutes.
  • Add the prepared rice strings and let it boil for another 7-10 minutes.
  • Add grated coconut, crushed nuts and crushed sesame seeds for garnishing
  • This tastes good hot or cold.
Tips:
  • The more thick you make rice dough strings the better. It will maintain its shape in the milk sauce/pudding, else it will end up being brittle, broken or melted.
  • You can make the strings with chakli press but be careful that the strings might melt down in the milk sauce/pudding.
  • Don't boil the milk pudding/sauce for more than 10 minutes.
Check my last year's post on Ganesh Chaturthi Prasadam

Wednesday, September 3, 2008

Happy Ganesh Chaturthi 2008

|| Om Ganeshaya Namah ||
|| वक्रतुंडा महाकाय कोटी सुर्य समप्रभः ||
|| निर्विग्नम कुरुमे देव सर्व कर्येशु सर्वदः ||

May Lord Ganesha Bless you with the best things in life.
I wish all my family members, friends, and my readers a Happy Ganesh Chaturti

Ganapati Bappa Morya..... Mangal Murti Morya...
Related Posts with Thumbnails