Sunday, July 29, 2007

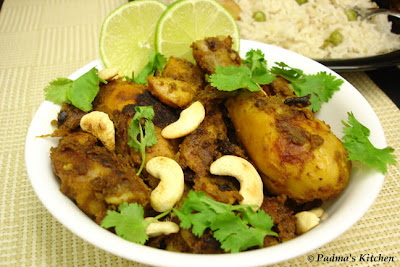
Chicken Fry with Green Peas Pulav Rice


Chicken fry inspired by Cinnamon trails


Chicken Fry

After getting inspired by seeing Cinnamon's mouthwatering Chicken fry the other day, I immediately planned the same for my Sunday lunch with green peas pulav. Today we had a treat having the chicken fry with some onion-cilantro-yoghurt's salad/raita with a can of cold diet pepsi. Yeah I have soda when I have something non-veg dish cooking, thats helps with digestion (my funda). Hope you will enjoy this nice, tasty and juicy chicken fry. Keeping it short and sweet though, here is my adapted version of Cinnamon's chicken fry followed by green peas pulav recipe.

Source: Adapted from Cinnamon trails
Cuisine: Andhra, South Indian
Prepration & Marinating time: 30 mins
Cooking time: 30 mins
Serves: 4
Ingredients:
1 pound of chicken thighs
1 medium size onion, sliced
2 green chillies, cut length-wise
2-inch cinnamon sticks (2)
4-5 cloves
2-3 bay leaves
1 tsp turmeric powder
1-2 tsp chilli/cayenne powder(paprika)
freshly greated nutmeg
1 tsp garam masala powder/spice mix
1 tsp jeera/cumin seeds
2 tbsp cooking oil
5-6 cashewnuts, halved and toasted for garnishing
1 tbsp chopped cilantro, for garnishing
salt as per taste
Grind to smooth paste:
1 small onion, roughly chopped
½ tomato, roughly chopped
2 green chillies, roughly chopped
1 inch ginger
2 cloves of garlic

Method:
  1. Clean the chicken and cut into bite size pieces or as per your requirements, you can keep the whole chicken thighs as it is.
  2. Marinate the chicken with turmeric powder, chilli powder, salt and the prepared paste for at least 15 mins.
  3. Heat oil in a large skillet, to this add the bay leaves, jeera/cumin seeds, cinnamon stick and cloves, fry for a minute.
  4. Add the sliced onions, green chillies and saute till the onions are translucent. To this add only the chicken pieces and fry them covered till they look cooked or for 10 mins.
  5. Afterwards add the remaining marinated paste, mix well and add the garam masala powder/spice mix, grate the nutmeg on top.
  6. Saute on medium high till all the moisture evaporates and the chicken pieces starts to caramelize, keep on frying till you get the desired color and flavor. Do check the spice level and salt, add if required.
  7. Garnish it with toasted cashew nuts and chopped cilantro.
  8. Serve with hot rice or any pulav/biryani.
Note:adjust your spice level accordingly while using green chillies or chilli powder.


Chicken fry served with green peas pulav


Green Peas Pulav

This green pea pulav recipe I learned from my Mother, who has inspired me in lot many ways and is a superb cook. I made a genuine attempt to bring in the same flavors as of my Mother but as is said, "Maa ka haath ka khane main kuch alag hi jaadu hain" But her formula works with ginger-garlic paste. This is a very simple and easy recipe to lay your hands on!

Source: My Mother
Cuisine: Indian
Prepration time: 10 mins
Cooking time: 20 mins
Serves: 4

Ingredients:
2 cups of Basmati rice, wash and soak for 10 mins
1 red onion, sliced
2 green chillies, cut lengthwise
½ cup fresh/frozen green peas
1 tbsp ginger-garlic paste
1 tsp jeera/cumin seeds
1-inch cinnamon stick
2-3 cloves
2-3 bay leaves
1 tsp garam masala powder/spice mix
1 cup whole milk or 2% milk
pinch of saffron strands (optional)
5-6 cashewnuts, halved
3 cups of water
salt as per taste

Method:
  1. Wash and soak the basmati rice for 10 mins approx.
  2. Heat oil in a medium size sauce pan, to this add the bay leaves, cinnamon stick, cloves jeera/cumin seeds and cashew nuts. Fry for a minute or till the nuts change to golden color and add the sliced onions, green chillies.
  3. Saute and add ginger-garlic paste, season with some salt, garam masala/spice mix, green peas and mix well all the ingredients. Lastly add milk to it.
  4. Stir in the rice and add water. For every 1 cup of uncooked basmati rice we have to add 2 cups of water, since we already added 1cup of milk to it we now add the remaining 3 cups of water.
  5. Stir, check the salt in it and cook on medium high heat uncovered for 10 mins and then cover and cook for another 5 mins.
  6. Once cooked fluff the pulav with fork and serve hot.

Chicken fry served with Green peas pulav, raita and lemon slices


Thursday, July 26, 2007

JFI-Chillies and my dinner menu for today

JFI-Chillies


This is my first Jihva entry for Chillies. JFI or Jihva for Ingredients is Indira's brainchild and each month our avid food blogger community and other food lovers join to celebrate one Indian ingredient. This event of JFI-Chillies is hosted by Nandita of Saffron Trail. I am using bell peppers which is also a chilli and hope this will qualify my entry.

I am voracious spicy-food eater and that's the reason you will find use of green chillies and chilli/cayenne/mirchi powder frequently in my recipes. So I please please recommend you to adjust the spice level according to you if you are trying my recipe. I always emphasis on this coz you might not end up with very hot air coming out of your ears ))>>>(oo)<<<(( Today's dinner menu is Lettuce Cherry tomatoes and Orange salad with honey-mustard-lime juice dressing, Spaghetti with roasted peppers, basil and dessert cups with strawberry preserve, whipped cream and cherry topping for dessert. Hope you all will enjoy as much as I did while cooking, yet to eat and this is a surprise dinner for my DH (darling hubby). I am posting individually for each recipe, scroll down...... I am sorry that I had to repost this due to some technical problem with my earlier posts.
Our dinner today: Salad, Spaghetti and Strawberry dessert cups


Lettuce orange cherry tomatoes salad with honey dijon and lime juice dressing

Refreshing salad on hot summer days
Source: My own
Cuisine: Global
Prep time: 10 mins
Serves: 4
Ingredients:
6 leaves of Romaine Lettuce, torn
6 cherry tomatoes, halved or quartered
1 orange, peeled and cut pod wise
1 carrot, grated
½ red onion, chopped
½ tsp orange zest
4-6 walnuts, toasted and chopped
for dressing:
½ lime/lemon juice
1 tsp dijon mustard
1 tbsp honey
2 tbsp extra-virgin olive oil
1 tsp sugar
pinch of salt/ as per taste
1 tsp ground black pepper

Method:
  1. Mix all the veggies in a bowl, top it with orange zest
  2. Prepare the dressing by first adding dijon mustard in the lime/lemon juice whisk well.
  3. Add freshly ground black pepper, salt, sugar, honey mix well.
  4. Whisk vigorously while adding extra-virgin olive oil.
  5. Spread over the salad, mix and cover it with plastic wrap and keep refrigerated.
  6. When ready to eat top it with chopped toasted walnuts.

Spaghetti with roasted pepper medley

Spaghetti with roasted peppers and basil

This is the first time I am trying Spaghetti at home, hope you all will enjoy this.

Source: Adapted from Giada's Everyday Italian

Cuisine: Italian

Prep time: 20 mins

Cooking time: 10 mins

Serves: 5-6 people

Ingredients:

1 small bunch of uncooked spaghetti (I use Barilla)

3 bell peppers, red, orange and yellow

4 tbsp of pasta sauce (tuttoroso/ragu)

1 big clove of garlic, chopped

2 shallots, chopped

½ of lime/lemon juice

½ of fresh basil leaves, torn

1 tbsp of roasted peanuts, coarsely grind

1 tsp of chilli powder (cayenne)

1 tbsp of grated cheese

1 tsp of butter

2 tbsp of extra-virgin olive oil

salt as per taste

ground black pepper for seasoning


slivered peppers for roasting in extra-virgin olive oil

Method:
  1. Cut the peppers lengthwise as shown in the above picture, coat them with 1 tbsp of extra-virgin olive oil, sprinkle some salt and ground pepper. Toss and roast it on a tava or in oven till the edges are browned.
  2. Meanwhile cook the spaghetti as per the instructions on the box, check al-dente, drain and keep aside.
  3. While the peppers are roasted heat butter and 1 tbsp of extra-virgin olive oil in a large sauce pan, saute garlic and shallots.
  4. To this add the pasta sauce, chilly (cayenne) powder, salt. mix and add the roasted peppers, stir well for a minute or two.
  5. Toss in spaghetti and add lime/lemon juice, roasted peanuts, torn basil leaves and let all the flavors combine.
  6. Sprinkle some grated cheese and serve hot.

Spaghetti with roasted peppers


Strawberry dessert cups with whipped cream

Strawberry dessert cups with whipped topping

This is very simple and easy dessert made within seconds and can be a great entertainer if you love strawberries. There are no restrictions on the fruit preserves to be used. I bought this at BJ's and you can even use jam or any fruity thing. Just top it with cream and garnish with your favorite fruit. I used bing cherries here. Hope you will like this quick and express recipe.

Source: My own
Cuisine:American
Prep time: 5 min
Serves: 6 people
Ingredients:
6 dessert cups/short cake cups
5 tbsp strawberry preserve/any fruit preserve
Whipped cream for topping(fresh or store bought)
4-5 fresh bing cherries for garnishing
Method :
  1. Place the store bought dessert cups in the serving plate, spread the strawberry preserve evenly on the top of the cup
  2. Top it with whipped cream as per your requirement. I love lil extra topping for mine.
  3. Garnish with chopped cherries or any of your favorite fruit.
  4. Serve immediately.
Yummy and delicious!


Gandhigiri, My Small Apt garden and Comments

I know this is out of topic-- apart from food blogging, but I wanted to post it on my blog. Only if you can spare some time to read it, especially on Gandhigiri.

Gandhigiri still works, is the current mantra buzzing in the H1B immigrants(Indians awaiting their GC application) these days. The abrupt closure of this path to a green card -- proof of lawful permanent resident status -- sent the applicants back to the queue for 2008, when they will have to spend more time and money, organizers of the protest said. There was a flower campaign arranged to protest USCIS for changing the visa bulletin. The gist of the campaign was to peacefully convey disappointment and concern at how things have evolved in the last month. Dilip Tekkedil, 32, a software engineer from North Andover, Mass., is one of the frustrated applicants who came up with the flower idea when his and many others GC application was not accepted.

This Flower Campaign message spread like wild fire and USCIS office was flooded with flowers from all across the country. I am sure all of you must have seen the hindi movie 'Lage Raho Munnabhai' released in 2006. In this movie its shown that one should always thank people for their deeds even if the person harasses you.. thank him and make him feel guilty by sending flowers. The same thing happened here. Though the message of non-violence of Gandhiji still works but the credibility goes to Rajkumar Hirani and Vidhu Vinod Chopra of LRM.

Sadly this sensational news was not shown on many news channels, if you are interested to digg more on this check here and don't forget to check the video links from the last link below.
USCIS Director's response to the flower campaign Reuters Article| Washington Post Article |New York Times Article | NPR Broadcast | Complete Media Coverage with Pictures and Video

source: Immigration Voice Forum
+++++++++++++++++++++++++++++++++++++++++++++

My Small Apartment Garden

A
small, simple and sweet little note on my apartment gardening. After getting inspired from Kalyn's vegetable garden and other bloggers gardens, finally I started with three plants, Holy Basil (krishna tulsi) thanks to Sharmi for offering me Tulsi plant, spear mint and methi/fenugreek. I was so excited to see them grow that I wanted to share these pictures with you. I know its kiddish to do so, but I cannot resist myself to post on my garden plants.
Spear Mint पुदीना

Fenugreek seeds sprouts मेथी

Holy Basil-Krishn Tulsi कृष्ण तुलसी


Thanks to Sharmi for giving me tulsi


I will update more on this once my mint, tulsi and methis grows nice and healthy in my coming posts. Thanks!
+++++++++++++++++++++++++++++++++++++++++++++

Comments

My friends from all across the globe send some beautiful messages and warm wishes by email for congratulating me on my blog. So thought of including the same here, its so hard to keep digging my mail box for their messages, so this is kinda on-stop-commentum.


Saroja Krishna: Hi Padma, Nice to see ur mail. As and when ananth told that u started a food blog , I am excited to see it.
Congrats on starting ur own blog. Its a nice blog and ur profile photo is good So, u r keeping urself busy by collecting and experimenting with new recipes waiting to see new and variety recipes on ur blog. All the best padma.

Sumeet Bose: Padma- This is a Great discovery of a cook. Incredible Innovative job and fantabulous to start with Mother -in-law's Pachadi.

Radhika: Hi Padma, Nice to see your food blog. Lots of wishes to you on this.

Preeti: Cool I checked it & you are really doing good work. I didnt know you were interested in cooking. Anyways keep doing it. i will visit when i need good ones :-)

Hari Annaiya: This is wonderful………..Padma...Great Job!!!!!!!! and below is one of his colleague's comment

Suchitra Ganapathi: Hey..This is so cool. I am a huge fan of Food blog sites, and I always (almost) turn to such sites if I am in doubt. It is so exciting to know that some one so clos(er) has hosted such a site. The photographs are really wonderful. She has a great talent

Sreejit: Sahi akka... dekhte hi mooh main pani aagaya.. all the dishes are wonderful... :)
I'd try few of those in this week end.. :) Veggie Akki Roti se start karta hoon ..

Rashi: hey thats g8 Padma

Lalitha(chinna):Ha ,so this is where all your recipies curiosity was going into!! Nice job. I just called divya and showed her the picture of bread snack and asked her to read the story.Even before reading she recognised the picture and after reading she confirmed Lata aunty wrote it.
So that is why u didn't have time to call. Keep it up. May you prosper in your adventure and master more and more recipes, art, craft, stitching and photography. Bye the bye nice writing too.

Bhanu: Hey paddu... your blog is too good. you become a very good cook now. why can't you open one small restuarent there :)

This list will be updated continously (0_0)


Tuesday, July 24, 2007

Shahi Mutton (Lamb) Kofta Curry

Shahi mutton kofta curry


The word 'Shahi' means rich in flavor and taste cooked with rich ingredients. I usually have Shahi Murgh Kofta curry at restaurants, I remember in Agra I had this with whole chicken tandoori , Agra ka Shahi Biryani and Lasooni Naan's. I still relish the supreb taste and my mouth still waters by the thought of it, wish I could take pictures at that time (May 2001). We were touring Northern India.

Small update about that tour is here. First we went to Jammu to visit 'Vaishno Devi Temple' from there we went to Dehradun, Mussoorie, Haridwar for Ganga Darshan, in Rishikesh we visited Ram Jhoola and Laxman Jhoola where we can find beautiful sceneries from Tehri -Garhwal region. Then we came to Delhi and our last destination was Agra to visit Taj Mahal. That was a whole "Tirthyatra' kinda of thing but once in Delhi we started eating non-veg. Agra's dinner was unforgettable for its Shahi taste and flavor, I am sure some of you have tasted it, mind-blowing! Thus the thirst for this recipe started by trying different variations but this was one successful attempt and the verdict is all yours, when you try this and tell me.

Well you can try the same kofta curry with ground chicken instead of ground lamb meat (kheema). If you are using Mutton, try to deep fry on medium high so that its cooked all through. Chicken cooks easily than lamb meat. Also a quick tip is marinate the keema overnight and refrigerate it, so that all the flavors blend well. This recipe calls for a good preparation before hand so be cautious if you are having guests, you dont want them to keep waiting "+_+"

Source: My Own
Cuisine: North Indian adapted from Mughalai Khana
Preparation time:15 mins

Marination time: 2-3 hrs/overnight

Cooking time: 30 mins

Serves: 6-7 people

Ingredients:

1 pound ground lamb meat (optional ground chicken)
.
1 handful(15-20) of cashewnuts, blanched and grind to paste
.
2 big tomatoes, blanched and puree (freshly prepared).
1 big onion, minced (put it in a food processor).
2 green chillies, cut lenghtwise (you can reduce as per your spice level).
1tsp red chilli powder(cayenne or as per your taste).
a pinch of turmeric powder
1 tbsp of garam masala powder (spice mix)

1 tsp of Kasuri methi, crushed (dried fenugreek leaves)

1 tbsp ginger paste

1 tbsp garlic paste

1 tsp jeera seeds (cumin)

4-5 cloves
2 inch cinnamon stick

2-3 bay leaves

1 tbsp of oil

1 cup of water

salt to taste
chopped cilantro for garnish

Oil of deep frying the koftas
for marinating:

1 tsp red chilli powder (cayenne)

½ tsp turmeric powder

½ tsp ground pepper
1 tsp of lime/lemon juice

1tsp salt
ingredients for the curry sauce

Method:

For meatballs:
  1. First marinate the kheema(ground lamb) with chilli powder, turmeric powder, ground pepper, salt and lemon juice. Cover with plastic wrap and keep it in refrigerator. You can do it the night before also. Don't worry about the salt, as its will get adjusted with the curry.
  2. Take the marinated meat, grab handful of meat and shape them into any size and shape you desire and deep fry the meat balls and keep aside
oval shaped meat balls sitting on the plate

For curry:
  1. Soak the cashewnuts in warm water for about an hour and grind to smooth paste.
  2. Slit the tomatoes with knife, do not cut them deep, just small cut and put it in hot water and blanch for about 5-6 mins, cool, peel the skin off the tomatoes and puree them.
  3. In a large sauce pan heat oil and add jeera(cumin) to it, fry for a min then add bay leaves, cloves, cinnamon stick and fry for a min.
  4. Add minced onions and sauté till they are translucent. Then add slit green chillies, tomato puree and sauté it for a min.
  5. Add the ginger paste and garlic paste, stir and add chilli powder, turmeric, garam masala powder, salt and sauté. Let it cook thoroughly and till the raw aroma is overtaken by pleasant aroma for about 15-20 mins.
  6. Check the taste of the gravy, if the onions are thoroughly cooked add the cashewnut paste mix well and add crushed kasuri methi. Stir in the meat balls and garnish with chopped mint/ cilantro/ parsley.
  7. Shahi mutton kofta curry is ready, serve hot with rice, biryani, naans or rotis or Indian flat bread.
Mutton kofta curry served with hot paratha


Friday, July 20, 2007

Tomato Basil Mozzarella and Red bell pepper Bruschetta

Bruschetta1my version of bruschetta

I love Italian food and very much in love with them apart from watching Giada De Laurentiis's 'Everyday Italian'. This bruschetta recipe is an adapted version of hers, hope you gonna enjoy trying this as we did enjoyed eating this. Very simple, elegant and easy to make recipe. If you cannot bake it in oven then you can simply toast the slices on a tava. One good thing about bruschetta is you can change the topping as per your inventory in your pantry.

I read an interesting article on the pronounciation of bruschetta where the author says "The word bruschetta is pronounced "broo-SKET-ta,' not "broo-shetta." Yet there it is, in a national television commercial being pronounced "broo-shetta," as in "Broo-shetta" Burger. (Yes, I know...)

What is so hard about calling a spade a spade, or in the case, a bruschetta? I am so frustrated with American companies perpetuating incorrect pronunciations. But even Buitoni is guilty of it, hawking their wares in the U.S.A. as made by "Byoo-toni" instead of "Bwee-toni" as it should be pronounced.

Are there bigger, more important issues in the world? Yes. Should I let it go? Sure. But this still pisses me off." If interested you can continue reading the comments made on this statement here. Bruschetta can be a good finger food, great for starters or just can accompany you for a tea-party! Also for more on bruschetta/crostini you can visit Sangita, Sharmi and Mishmash to check their versions.

Source: adapted from Giada De Laurentiis (channel FoodTV)
Cuisine: Italian
Preparation time:10 mins
Baking time: 10 mins
Serves: 5-6 people
Ingredients:
1 large French baguette or any Italian bread, sliced 1-inch thick (about 36 slices)
4-5 sprigs of fresh basil leaves, coarsely chopped
1 red bell pepper, finely chopped
2 medium sized plum tomatoes, de-seed and finely chopped
1 tsp of rosemary, fresh or dried(optional)
1/2 cup shredded mozzarella cheese
2 tbsps of extra-virgin olive oil
2 cloves of garlic, grated
freshly ground black pepper
Salt as per taste

Method:
  1. First preheat the broiler, meanwhile slice the baguette and line them up on a cookie sheet. Drizzle with some extra-virgin olive oil and sprinkle with salt and pepper.
  2. Broil the bread for a min on the upper shelf till it turns light brown, be careful not to burn the bread, remove and set the oven to 350 degrees F.
  3. In the bowl mix the basil leaves, remaining olive oil, grated garlic, rosemary, chopped tomatoes and red bell pepper and season with salt and pepper.
  4. Spread one tablespoon of the tomato mixture on each piece and top it with shredded mozzarella. Since I am not a cheese fan, i used very little cheese. But those who are cheese lovers you can replace the shredded ones with thick sliced mozzarella.
  5. Place bread back in oven and melt cheese slightly and till the aroma of basil fills your kitchen.
  6. Place bruschetta on decorative platter and serve hot.
tomato basil mozzarella red bell pepper bruschetta


bruschetta, ready to eat!


Wednesday, July 18, 2007

Minty Watermelon Lemonade

Minty Watermelon Lemonade
minty watermelon lemonade

It’s hot! You’re dying for a long, tall, cold drink. Forget about the so-so soda or the same-old iced tea. In just minutes, you can whip up a fruity liquid antidote to beverage boredom that will cool and refresh. This crowd-pleasing watermelon lemonade will slake your thirst and startle your taste buds. When the mercury rises, this is what generally comes to my mind, a soothing cool drink with minty flavor. This is my entry to AFAM-Watermelon (a-fruit-a month) hosted my wonderful Jai & Bee of Jugalbandi.


Source: My own
Cuisine: Global
Preparation time: 5 mins
Serves: 4 people

Ingredients:
1 pound watermelon, ripened
½ cup lemon juice, freshly squeezed
½ cup sugar
3-4 Mint leaves, crushed

Method:
  1. Cut the watermelon into large big chunks.
  2. Put all the ingredients in a blender and mix well.
  3. If you want, you can sugar the rim of the glass and garnish with a watermelon slice and lemon wheel.
  4. Makes four one-cup servings.


crowd-pleasing drink


a-fruit-a-month Watermelon


Sunday, July 15, 2007

Pacchi Dosakai pachadi with Chintakai thokku aka Raw melon cucumber with tender tamarind pachadi (side-dish)

Pacchi Doasakai-chintakai pachadipachi dosakai-chintakai pachadi

This is a very traditional, authentic pachadi which mainly belongs to Southern Andhra. The main ingredients are dosakai and raw chintakai thokku (tender tamarind crushed on rock with turneric powder and salt). Not many people know this recipe, even I was not aware of this as I belong to Northern Andhra (Vizag). My mother-in-law is here and taught me this unique, tasty and interesting pachadi. She brought chintakai thokku from India and we mainly use it for chintakai pachadi and pacchi dosakai pachadi too. I am sure you will also try this pachadi for its out of the world taste!

There are many more of my MIL's recipes to be blogged, you will soon see them in my upcoming posts.


Source: My Mother-in-Law
Cuisine: South Indian, Andhra
Preparation time:10 mins
Cooking time: 7 mins
Serves: 4-5 people

Ingredients:
1 medium size dosakai (melon cucumber) weighs about 350gms
10 green chillies, cut lenghtwise (you can reduce as per your spice level)
1 tsp dhaniya (coriander seeds)
1 tsp jeera (cumin seeds)
Handful of toasted peanuts, peeled
3 tbsps of chintakai thokku
1 tbsp of cilantro, chopped
Salt as per taste
1tsp of oil
for tempering/tadka:
1 tsp of mustard seeds
few curry leaves
a pinch of asafeotida
1 tsp of oil

ingredients for the pachadi
Method:
  1. Peel the dosakai (melon cucumber), deseed and chop into very small and thin pieces or cubes.
  2. Heat the oil and add green chillies, saute it till cooked and be sure not to burn them.
  3. To this add dhaniya (coriander seeds) and jeera (cumin seeds) and fry for a min, cool and keep aside
  4. First grind roasted peanuts and add the chillies, chintakai thokku, cilantro, salt and just grind coarsely so that all ingredients are mixed well.
  5. Mix this with dosakai pieces and keep aside.
  6. For tempering heat a tsp of oil, add mustard seeds let them splutter, add curry leaves and fry for a few seconds on low heat.
  7. Lastly add a pinch of hing/ asaefotida and pour the tempering on the pachadi, mix well and serve with hot rice.

Pachi dosakai-chintakai pachadi served with hot rice


For tender tamarind thokku/chintakai thokku:

Chintakai thokku/ crushed tender tamarind
One can make chintakai thokku at home by mixing the raw chintakai (tamarind) with turmeric powder and salt, mix well and keep it aside for 2-3 days for tenderizing the chintakai. Later on crush it with a Stone Mortar and Pestle and keep refridgerate in an air tight container the thokku, like this it can stay till 1 year or so. We also get the tender tamarind in Indian grocery stores, I have seen them occasionally at Edison Subzi Mandi, NJ.


Friday, July 13, 2007

Punjabi Gobi Aloo Muttar ki sabzi

punjabi gobi aloo muttar ki sabzi

This is very first entry to RCI Punjab event hosted by Richa of As Dear As Salt. RCI stands for 'Regional Cuisines of India', a very innovative idea started by Lakshmi of Veggie Cuisine . Punjabi cuisine is famous for its rich and spicy ingredients and mouthful of tasty food. The favourite dishes flashes to you mind when you think of Punjab is Sarson ka Saag and Makke di roti, Lassi, Punjabi Samosa, Parathas and many more. It also reminds me of 'Dilwale Dulhaniya Le Jayenge' (Superhit Hindi Movie).

This everyday PGAM sabzi is generally eaten with rotis or parathas(flatbreads) as well as a yogurt relish and some pickles. You may serve it as part of any meal, along with greens, beans, and rice or bread.


Source: My own
Cuisine: North Indian, Punjab
Prep time: 20 mins
Cooking time: 20 mins
Serves: 4
Ingredients
2 medium potatos, peeled and cut into medium size cubes
1 crown of cauliflower-medium size,cut into delicate florets
1/2 cup of green peas
1 medium onion, finely chopped
1 medium tomato, finely chopped
1/4 cup home made yougurt (for gravy)
1-2 tsps chilli powder (cayenne)
1/2 tsp of turmeric powder
1 tsp jeera(cumin) powder
1 tsp dhaniya (coriander) powder
1 tsp of jeera/cumin seeds
2 tbsps of cooking oil
salt as per taste
few sprigs of cilantro/parsley, roughly chopped
for grinding:
1 small onion, cubed
3-4 green chillies, chopped
1 tbs ginger, roughly chopped
1-2 cloves of garlic, crushed
1 tbs lemon juice
1/4 cup of cilantro/green coriander

Method:
  1. Boil potatoes and cauliflower florets in a sauce pan with some salt, cook till the florets are tender, donot overcook. Drain and keep aside. Meanwhile grind the ingredients in a food chopper/grinder to a coarse paste.
  2. Heat oil in a kadai and add jeera/cumin seeds to it, fry for a min.
  3. Add chopped onion and little salt to sweat the onions, sauté for a 1-2 mins and add the coarse paste and sauté.
  4. Then add the chilli powder, coriander powder, cumin powder and turmeric and add the chopped tomatoes. Sauté till tomatoes are tender and cooked, about 4-5 mins.
  5. Now add the boiled potatoes, cauliflower florets and peas, stir well so that the vegetables are coated with the masala. Cover and let all the flavors blend in for about 7-8 mins or till the vegetables are fully cooked.
  6. Lastly stir in the yogurt and garnish with fresh chopped cilantro/parsley leaves.
  7. Serve hot with rotis/parathas (flat bread) or hot rice.

My entry for RCI-Punjab PGAM ki sabzi

our lunch today... PGAM ki sabzi with rotis, rice and dal fry

Thursday, July 12, 2007

Stuffed Egg Bread Potlis

Stuffed egg bread potlis, halved and served with ketchup

Stuffed egg bread potlis/small pouches are my new invention in finger foods, I tried them for the first time when a dear friend visited us. I wanted to make something different, unique, loaded with veggies and yet tasty for her kids. This is a quick easy, simple recipe and very entertaining because of its color. I am sure you gonna love this. I used egg batter for coating the potlis which can be easily substituted by besan (chickpea flour) batter and you need to deep fry this in oil juz like fritters or pakodas.

Source: My own
Cuisine: Indian
Prep time: 20 mins

Cooking time: 20 mins

Serves: 4-5
Ingredients
8-10 regular bread slices, trim the hard ends
2 eggs
1 cup of mixed vegetables (carrots, beans, peas,corn)
2 red beets
1 large potato, boiled
1 medium onion
2 tbs grated ginger
1 tbs lemon juice
2 tbs almonds, chopped
1 tbs green chillies,finely chopped
1/4 cup oil for frying
1/4 tsp chilli powder (cayenne)
Salt and pepper


Method:
  1. Boil in a pressure cooker the mixed vegetables and red beet.
  2. In a dish mash the boiled vegetables and boiled potato.
  3. Add chopped onions, almonds, ginger, lemon juice, green chillies, salt, pepper to the mixed vegetables and mix properly.
  4. In a separate container, beat the eggs thoroughly.
  5. Heat oil in a pan on a medium flame.
  6. Take one slice of bread and pat it with warm water to make it soft.
  7. Then take it in the cup of your left hand and add some of the vegetable mixture in the middle of the bread and close the sides of the bread.
  8. Dip this in the beaten egg mixture and fry it till golden brown, it will have french toast texture and don't worry its less oily.
  9. Serve hot with tomato ketchup.
Tips & Note: If you cannot use eggs for coating you can use besan (chickpea flour) batter, but only problem is you need to deep fry the potlis.

stuffed egg bread potlis/small pouches

Tuesday, July 10, 2007

Curried Chicken Teriyaki Noodles

Curried Chicken Teriyaki with egg Noodles

I have this craving for "Anything Teriyaki" since I first tasted this dish at Chinese buffet. They had many varieties of chicken dishes like, ginger chicken, sesame chicken, orange chicken, barbeque chicken, honey chicken but I liked teriyaki chicken the most for its unique asian flavors. My version of teriyaki chicken is with egg noodles and few veggies and some dash of Indian flavors as I like my chicken to be little spicy.

You will find most of my recipes little spicy and hot as I love hot food. One can substitute the chicken with prawns/shrimps, tofu/soya chunks/mealmaker (for
vegans). This is very quick and easy recipe for a lazy dinner; if you are really tired to cut those veggies, you can simply opt them out or use frozen vegetables, any which way works out great!

Source: My own
Cuisine: Japanese cuisine
Marination time: 1-2 hrs
Prep time: 20 mins

Cooking time: 20 mins
Serves: 4

Ingredients:
1 ½ pounds of boneless, skinless chicken breasts
225 gms/ 8 ounces of dried egg noodles
6 baby carrots, thinly sliced on diagonal
1 green bell pepper, thinly sliced
1 medium onion, sliced you can use green onions too.
3-4 shallots, thinly sliced
1 cup baby corn
1 tsp cayenne pepper/chilli/mirchi powder
Salt as per taste
1 tbsp of sesame oil
2 tbsps cooking oil
For marination:
5 tbsps teriyaki sauce
2 tbsps worcestershire sauce
1 tsp of dijon mustard
1tsp black pepper powder
2 garlic cloves, minced
½ medium size onion, diced
2 green chillies, chopped
3-4 curry leaves, torn
2 tsps salt

marinated chicken breasts

baby corn, carrots, green bell pepper, onions and shallots

chicken strips marinated in the sauce for 1-2 hrs

Method:

  1. For marination in a bowl add teriyaki sauce, dijon mustard, worcestershire sauce, minced garlic, chopped green chillies, diced onion, salt, pepper, torn curry leaves and mix well. To this add chicken breasts.
  2. Flip the chicken breasts in the sauce, so that its submerged in the sauce, cover it and marinate for 1-2 hrs in the refrigerator and then slice the chicken into 1/3 inch thick strips, keep aside.
  3. Meanwhile cook noodles in large pot of boiling salted water until just tender. Drain well; return to pot. Add sesame oil and toss to coat.
  4. Heat oil in a large skillet over high heat, add the marinated chicken pieces and sauté until no longer pink, about 2 minutes.
  5. Add sliced red onions, carrots, green pepper and baby corn and add the leftover marinated sauce. Stir-fry until vegetables are crisp-tender and chicken is cooked through, about 2 minutes longer.
  6. Add cayenne pepper, salt and stir then add the cooked noodles and toss to blend well.
  7. Serve hot.
curried chicken teriyaki with egg noodles

Sunday, July 8, 2007

Veggie Akki Roti/ Rice Flour Rotis

our weekend breakfast, Akki roti with coconut-dalia chutney

Akki Roti- Karnataka's favourite breakfast

Akki Roti is a Karnataka recipe which I tasted at my friend's place and loved it. This is a famous breakfast and very popular in homes across Karnataka. There are many ways of preparing it, but my friend taught me the easy way of making these rice rotis. One can make it by simply adding jeera (cumin seeds) and salt or make it richer by adding veggies. Here is my recipe and few tricks on how to make it easy.

Source: Friend
Cuisine: South Indian, Karnataka

Prep time: 20 mins & Cooking time: 20 mins

Makes: 8-10 Rotis
Ingredients:
2 1/2 cups of rice flour (makes 8-10 rotis)
1 medium onion, finely chopped
1 carrot, grated
1 cucumber, grated (deseed if seeds are large)
2 green chillis, finely chopped
Handful of green coriander/cilantro, roughly chopped
1 tsp cumin seeds/jeera
½ cup home made yogurt/dahi
2 tbsps oil
Salt as per taste
1 cup of water, accordingly

Method:
  • Combine rice flour and chopped and grated veggies, add jeera(cumin seeds), salt, yogurt and mix well.
  • Add water to it slowly and keep on mixing till you get a thick consistency like uttappam batter (not like dosa batter)
How to prepare the rotis on pan


  • Take a light weight non-stick pan, pour some oil, I use canola oil spray, pick handful of the batter and spread it with your hand on the pan and then lit the stove. Remember the pan should be cold and greased when you pour the batter into it.
  • You may brush some oil on the top side and then turn around. It will take around 2-4 mins to cook on each side of the roti.
  • For the next roti, run the bottom side of the pan in cold tap water, so that the temperature is reduced and repeat the same procedure.
  • Serve hot with any Indian pickle or chutney of your choice like Coconut-Dalia chutney.
Akki roti, the easy way of making...

Coconut - Dalia Chutney/ Pachadi

Coconut - Dalia Pachadi

Chutneys have always contributed an important role in Indian cuisine and coconut being the main ingredient; acts as a binding factor to the chutney. There are many variations in making coconut chutney, instead of making with peanuts, today I used Dalia and green chillies. This gives a starchy, nutty flavor to the chutney with a kick of spice from the green chillies and also helps in reducing cholesterol intake. You might think I am using coconut which is full of cholesterol, but to get rid of the oils, I buy the frozen shredded coconut and squeeze the milk/oil out of it once thawed, that way I can reduced some amount of oil/fat in it. This chutney goes very well with any kind of dosas, idlis, pesarttu, etc,.

Source: My Mother
Cuisine: South Indian, Andhra

Prep & Cooking time: 10-15 mins
Serves: 4-5 people
Ingredients:
1 cup of coconut, freshly grated or frozen thawed
¼ cup of dalia / putnala pappu/chutney dal/roasted gram dal
3-4 green chillies
½ tsp jeera (cumin seeds)
3-4 karvepaku leaves/curry leaves
½ cup – ¾ cup of water
Salt as per taste.
For tadka/tempering:
1 tsp mustard seeds
1 tsp urad dal/black gram dal/minappapu
2 dried red chillies
A pinch of hing/ asaefotida
1tsp of oil

Method
  1. Grind together all the ingredients with out adding water first.
  2. Add ¼ cup water at a time and grind it to smooth paste.
  3. For tempering heat a tsp of oil, add mustard seeds let them splutter, add Urad dal, add red chillies and curry leaves and fry for a few seconds on low heat.
  4. Lastly add a pinch of hing/ asaefotida and pour the tempering on top of the chutney, mix and serve.

Thursday, July 5, 2007

A Journey to my Kitchen

They say the kitchen is the focal point of the household, and that's the way it is in our home too. My actual interest in cooking started after coming to USA, as I had lot of time to invest in this new hobby. I was introduced to the food blogs by Sharmi of Neivedyam, a dear friend and well wisher. Soon I was hooked to food blogs like Sailu’s Food, Mahanandi, Akshayapatra, Kalyn’s Kitchen, Chubby Hubby and few others to mention.

Cooking happened to me when I was a kid helping my mother in kitchen, though I was not experienced in bringing the delicious mouthwatering taste as my mother did, after all its "Maa ka haath ka khana". Most of the recipes, cooking tips and tricks I learn't from my Mother, few from my Mother-in-law, my cousins, friends, cookbooks, cook shows, Sanjeev Kapoor's Khana Khazana and internet.

My hubby encouraged and inspired me to start my own collection of recipes. So this is my first trial to create a virtual kitchen, where I can share my interest for life’s tastier side with others.

Padma’s Kitchen is a book of my-tried-out recipes; you will find tastes from India especially from Andhra, Maharashtra, South and North Indian recipes with a fusion of east and west, and few International cuisines too. I hope you will enjoy trying them too. Comments left on the blog go directly to the email, and are always appreciated. Feel free to write in.

This Kitchen is seasoned with *Love*
Related Posts with Thumbnails